![FullLogo-2019-1-e1576087441910.png]](https://hubspot.stayfi.com/hs-fs/hubfs/FullLogo-2019-1-e1576087441910.png?height=50&name=FullLogo-2019-1-e1576087441910.png)
Guesty is a fast, flexible vacation rental software which provides direct booking websites, channel management, and a full suite of short term rental management tools to homeowners and property managers. StayFi’s integration with Guesty lets Guesty Pro users import their guest list into StayFi and use StayFi’s internal email and text marketing tools to stay in touch with past guests. Guesty users can also use StayFi’s wifi splash pages to collect the contact information of every guest, not just the booker, thereby growing their guest list quicker and having a more complete idea of who is staying at their properties.
With this two-way integration, guest data collected by StayFi will automatically be matched with reservation information from Guesty to build a more complete guest list for each stay. Guesty users can expect to see more guests associated with each reservation in Guesty, and will be able to set up marketing automations that get their brand in front of every guest through StayFi. StayFi will help Guesty users build brand awareness, expose all guests to upsell opportunities, and make sure all guests book direct in the future.
The integration also makes it easy to import properties into StayFi for faster onboarding, and adds additional functionality like dynamic occupancy alerting to StayFi's guest tracking capabilities. The following document outlines the setup and functionality of the integration.
Table of Contents
- Connecting your Guesty account with StayFi
- Importing Guesty Properties into StayFi
- Linking Existing StayFi Properties With Guesty
- Importing Historic Guesty Contacts to StayFi
- Pushing Guest Data From StayFi to Guesty
- Using Guesty Contacts in StayFi's Email Marketing
- Setting Up Dynamic Occupancy Alerts
Connecting your Guesty Account with StayFi
Connecting your Guesty account to StayFi will let you import your Guesty properties and contacts into StayFi. This will help you keep track of all of guests and reservations in one place, keep property information consistent between platforms, and enable functionality like dynamic occupancy alerting. Guesty contacts can also be added to StayFi's email marketing tool to help you stay in touch with past guests.
You will be taken through an onboarding flow which walks you through connecting your PMS to StayFi and importing properties and contacts from your PMS when you first create a StayFi account. If you didn't connect your Guesty account with StayFi initially, head to the integrations page, select Guesty, and input your Guesty API key to get started:
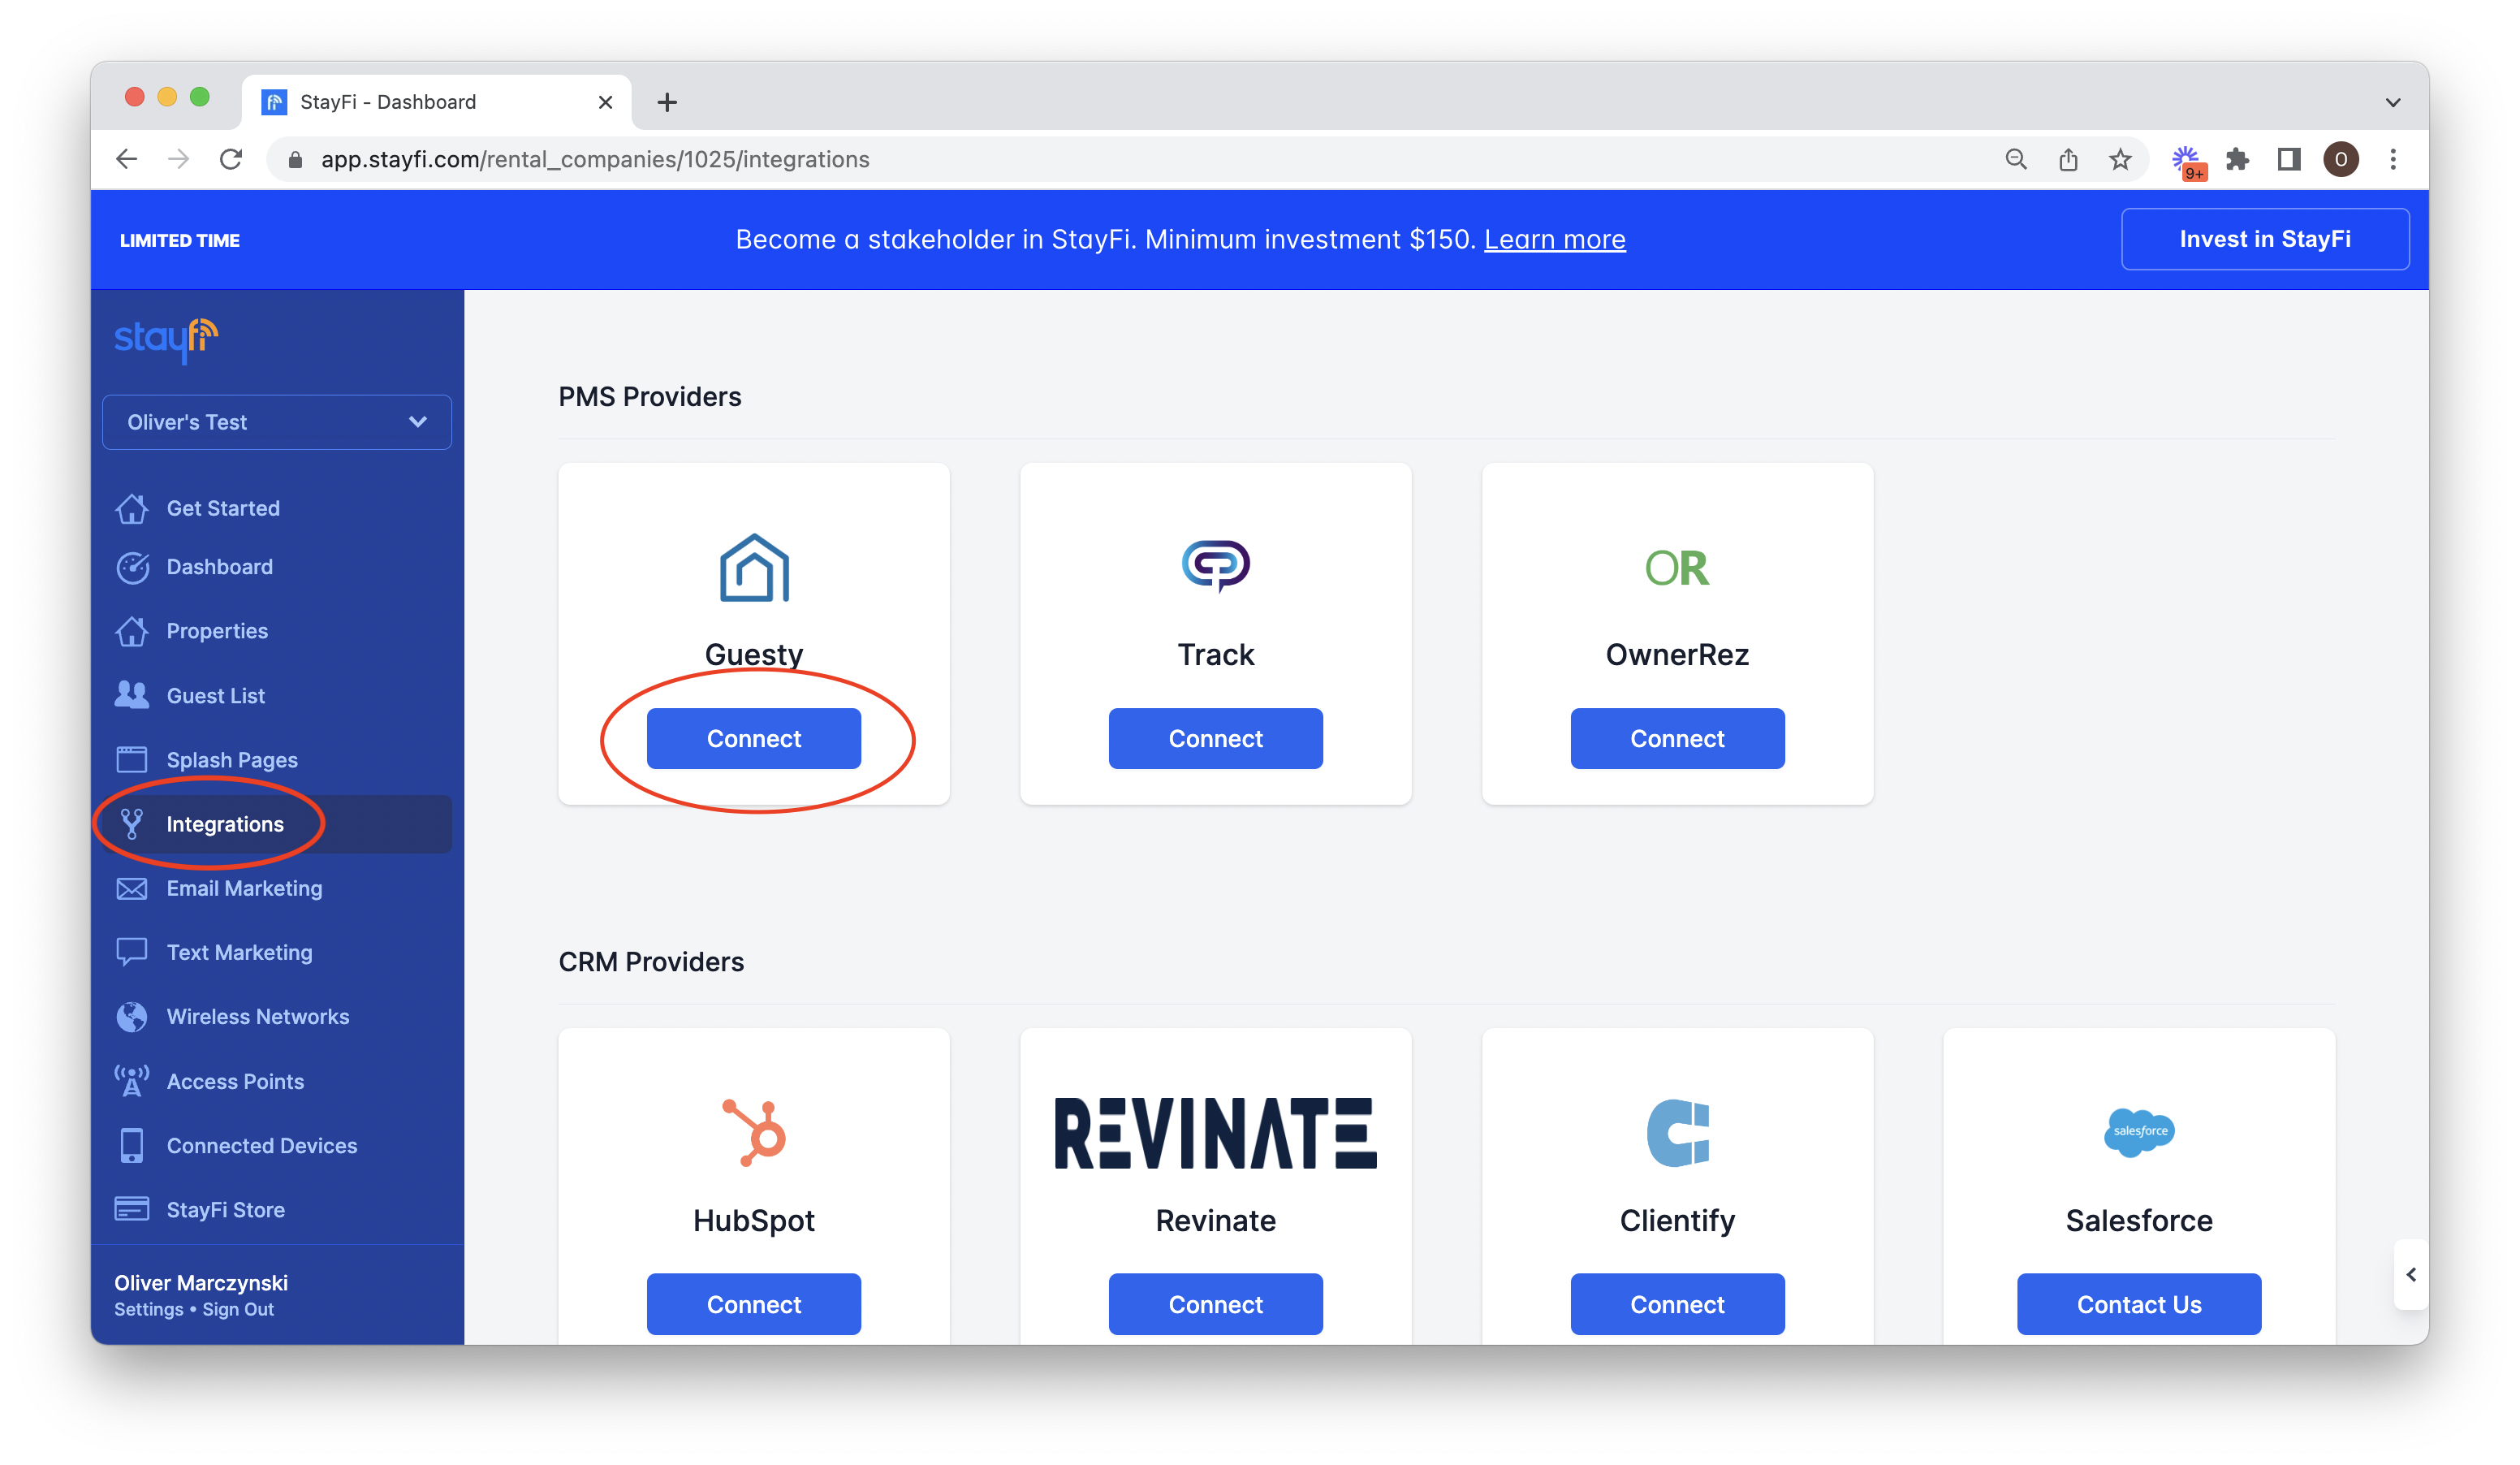
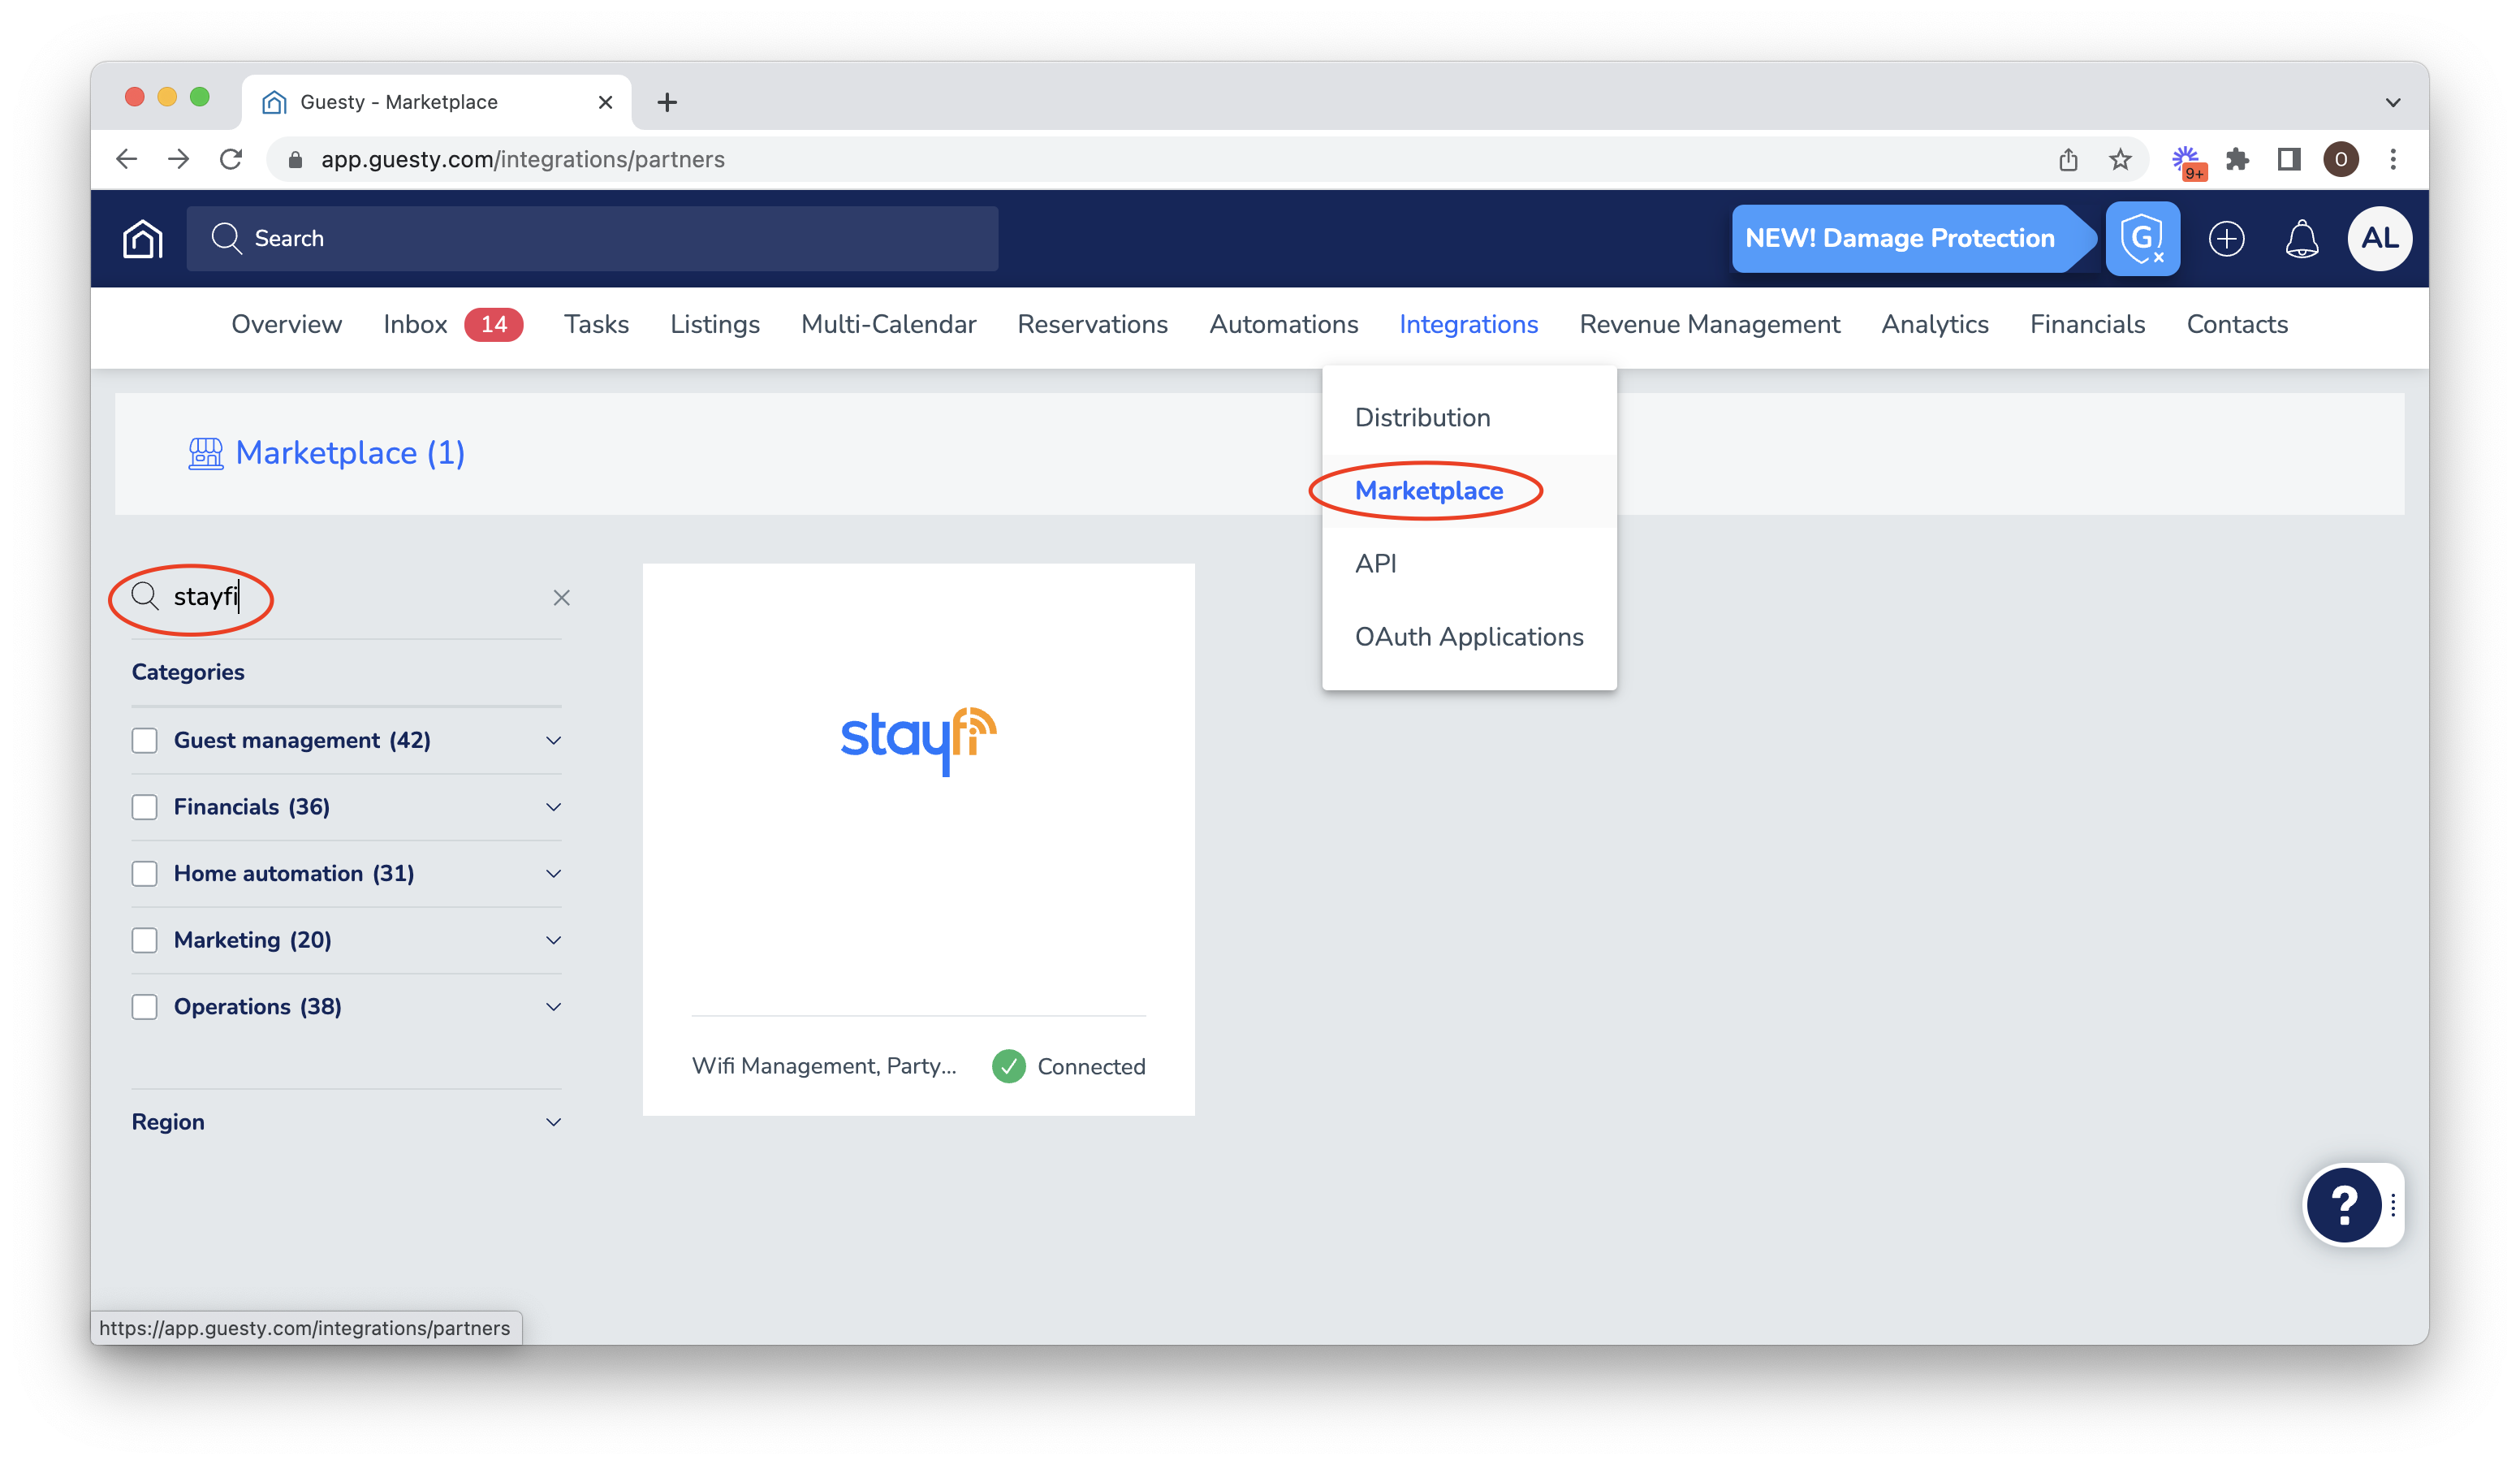
To generate an API key go to Integrations > Marketplace, search for StayFi and click "Connect" in your Guesty account:
Importing Guesty Properties into StayFi
Adding properties in StayFi helps keep track of where guests are logging in from and where different wifi access points are located. Tracking properties correctly will make sure data is tracked cleanly, and will let you personalize any marketing messages based on where each guest stayed.
Importing your Guesty properties into StayFi will make onboarding quicker, lead to fewer mistakes, and will ensure that guest data gets assigned to the right spot in your PMS. This also helps maintain consistency between both systems.
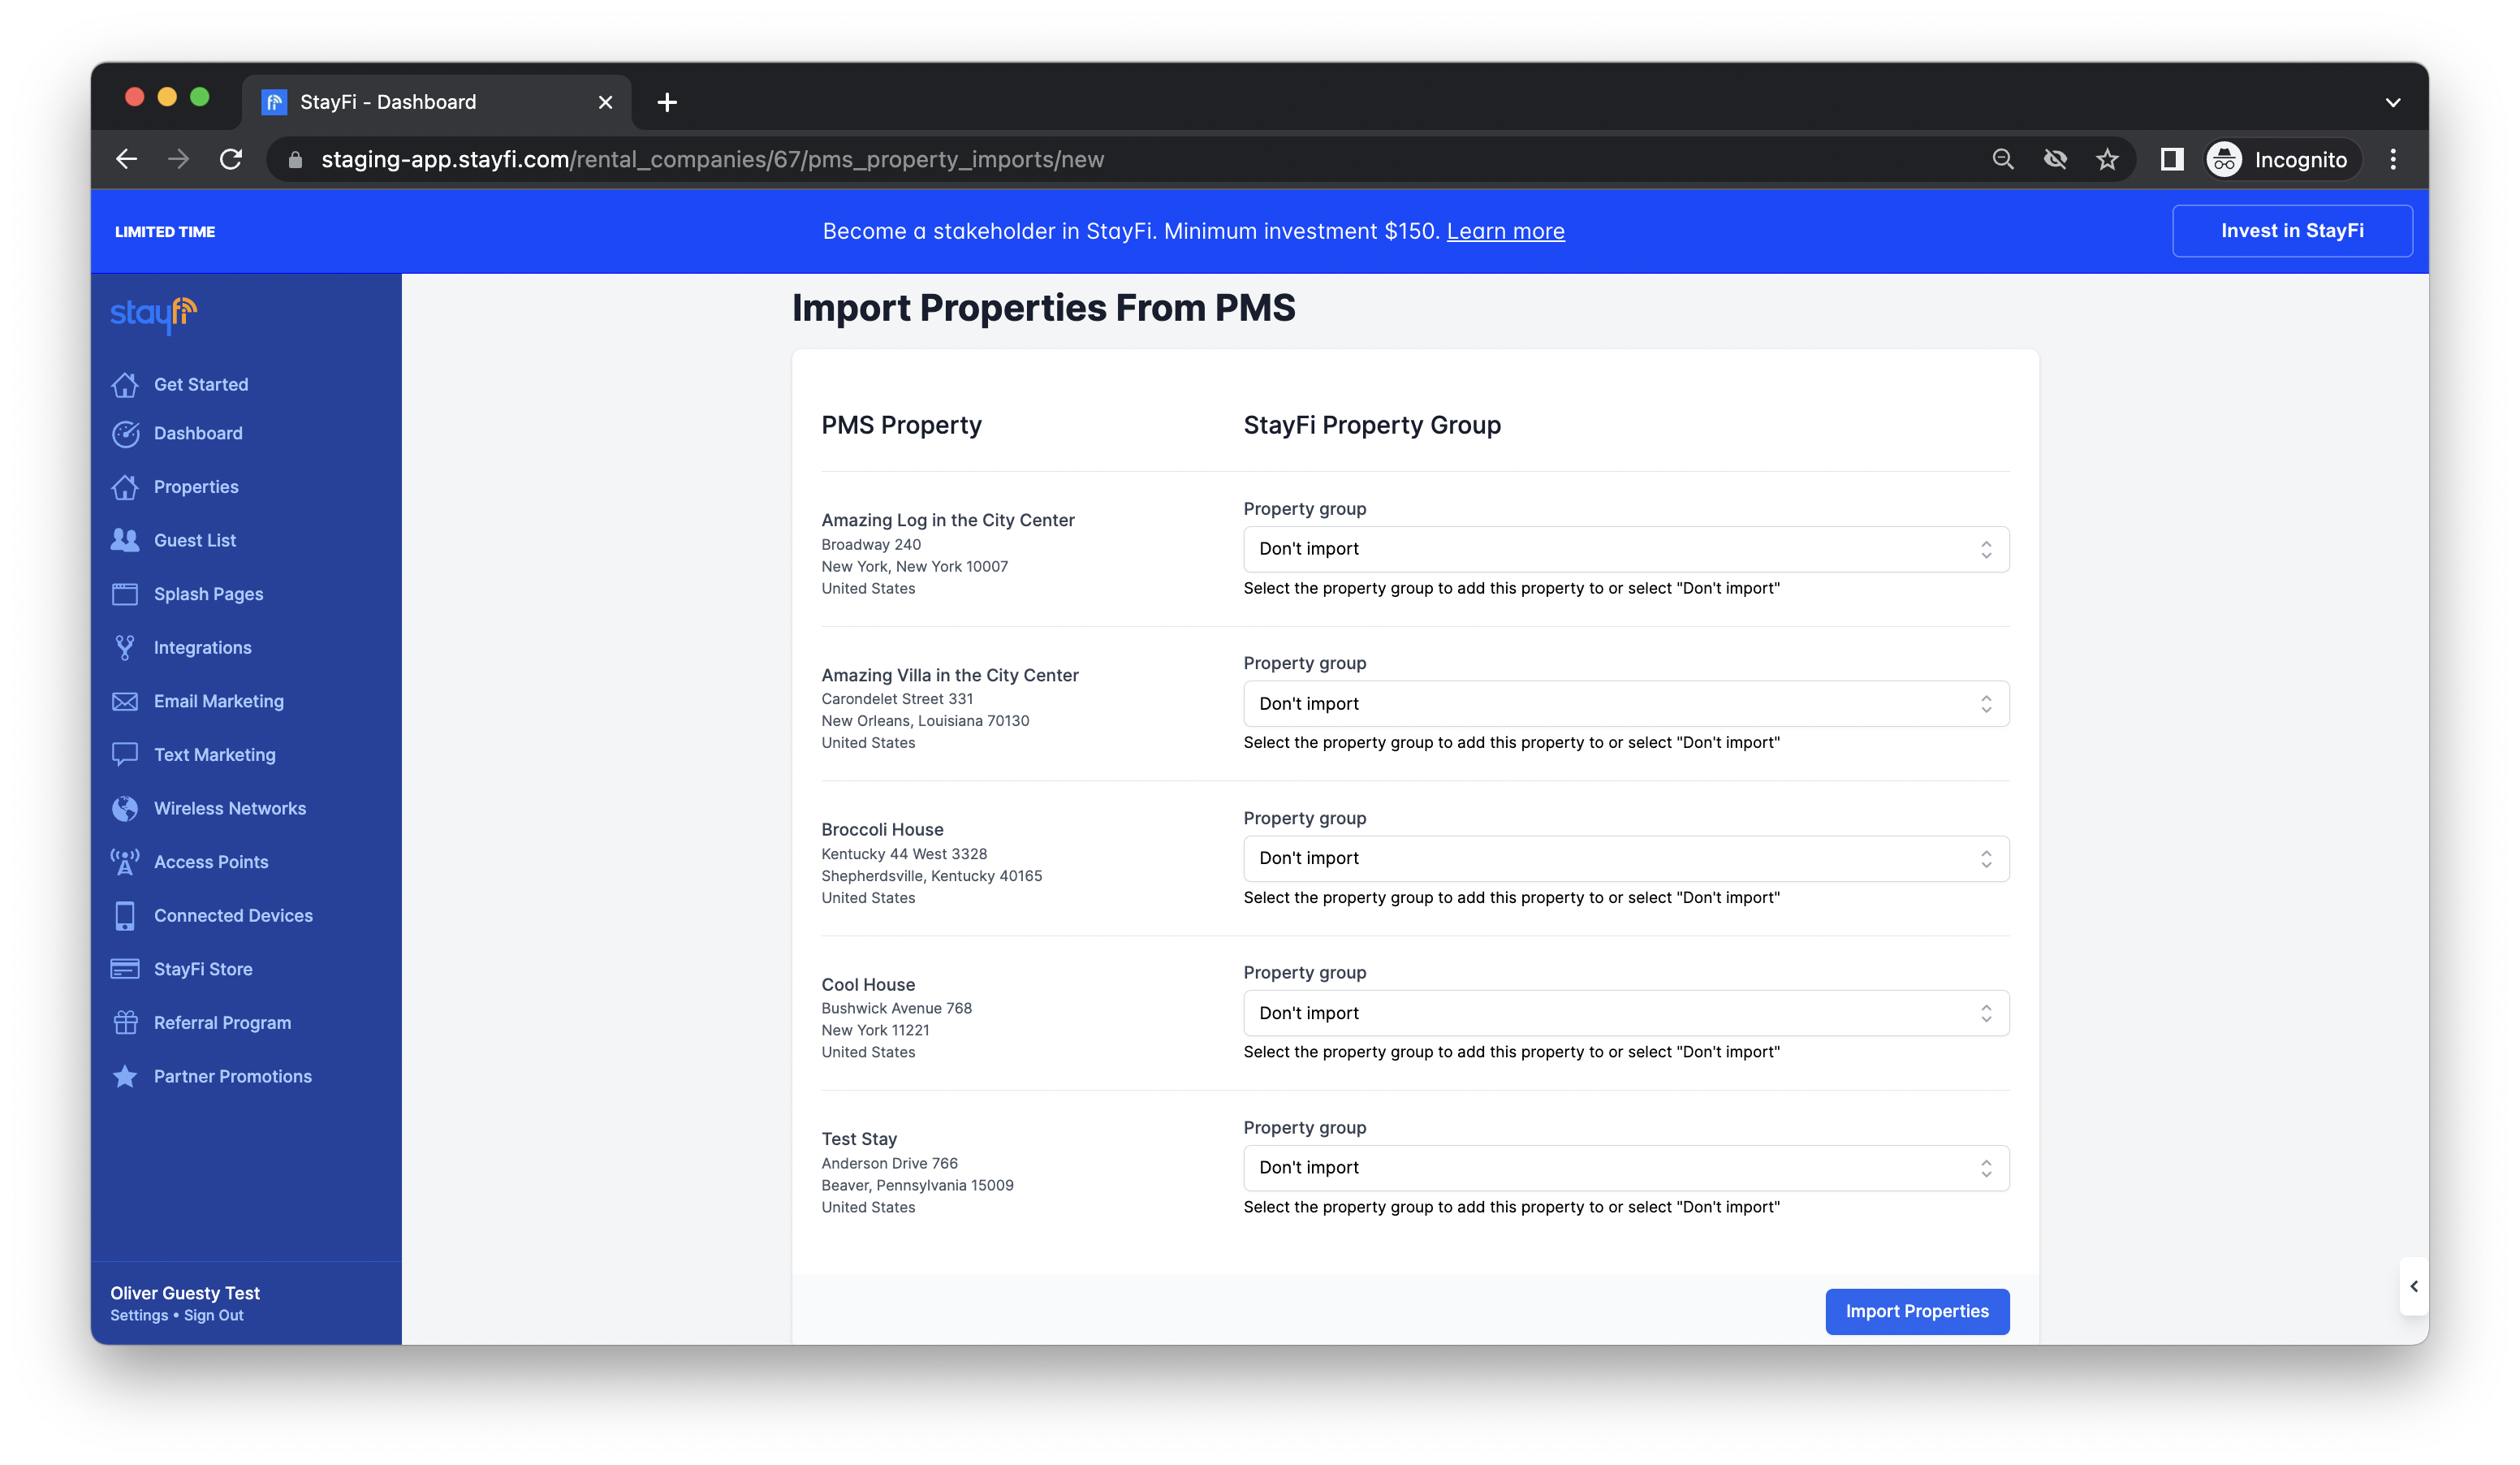
Before importing Guesty properties into StayFi, you will need to create a splash page and create property groups. Once you've done this, head to the Properties page and select Import Properties from PMS:

You will now see a list of properties from your Guesty account with the option to select which group you'd like to assign them to in StayFi. Assign each property to a group or select "Don't import" from the dropdown menu. Once all properties have been assigned a group, select Import Properties at the bottom of the page:
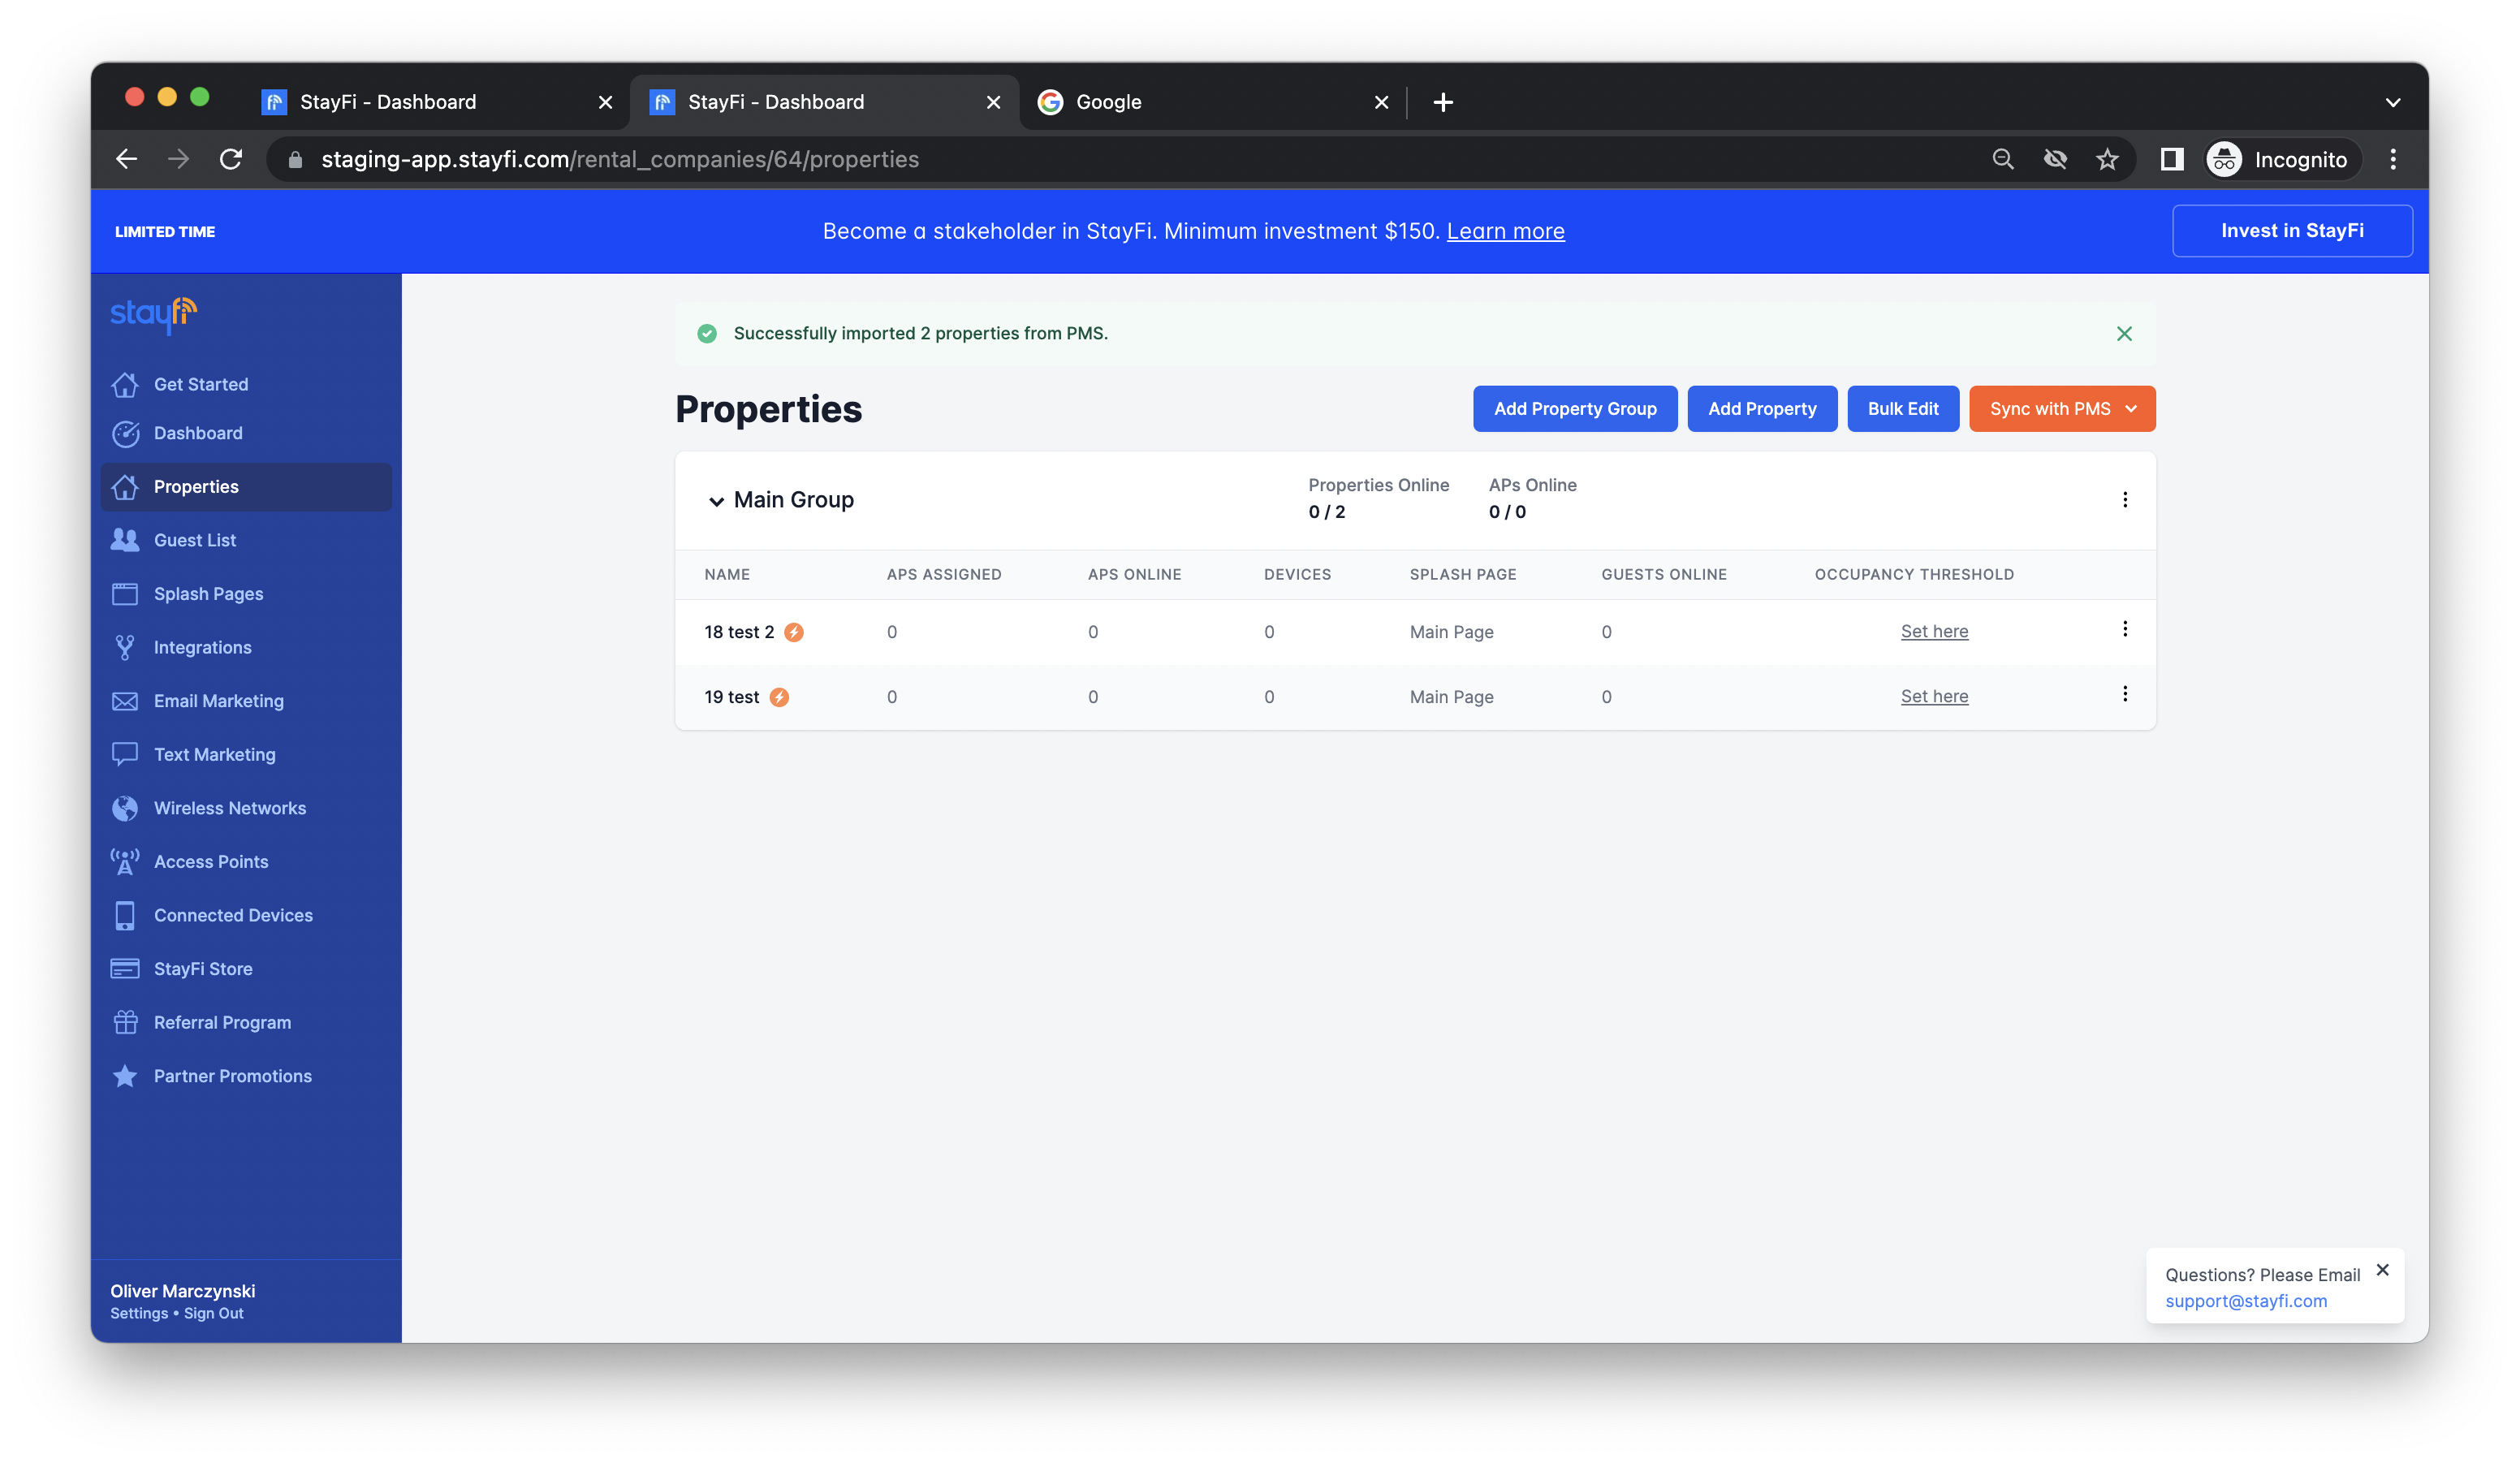
All selected properties will be imported into the appropriate group in your StayFi account. New Guesty properties can be added using the Sync with PMS button, and selecting "Import new properties" at any point:
Linking Existing StayFi Properties With Guesty
If you've already manually created properties in StayFi, you can link your existing StayFi properties with the corresponding property in Guesty. Linking properties is preferred over creating new properties in StayFi as it will preserve all splash page settings and guest data that has already been collected. Make sure your Guesty account is already connected to StayFi before going through the following steps.
From the Properties page, click "Sync With PMS" and select "Update Existing Properties" from the dropdown menu: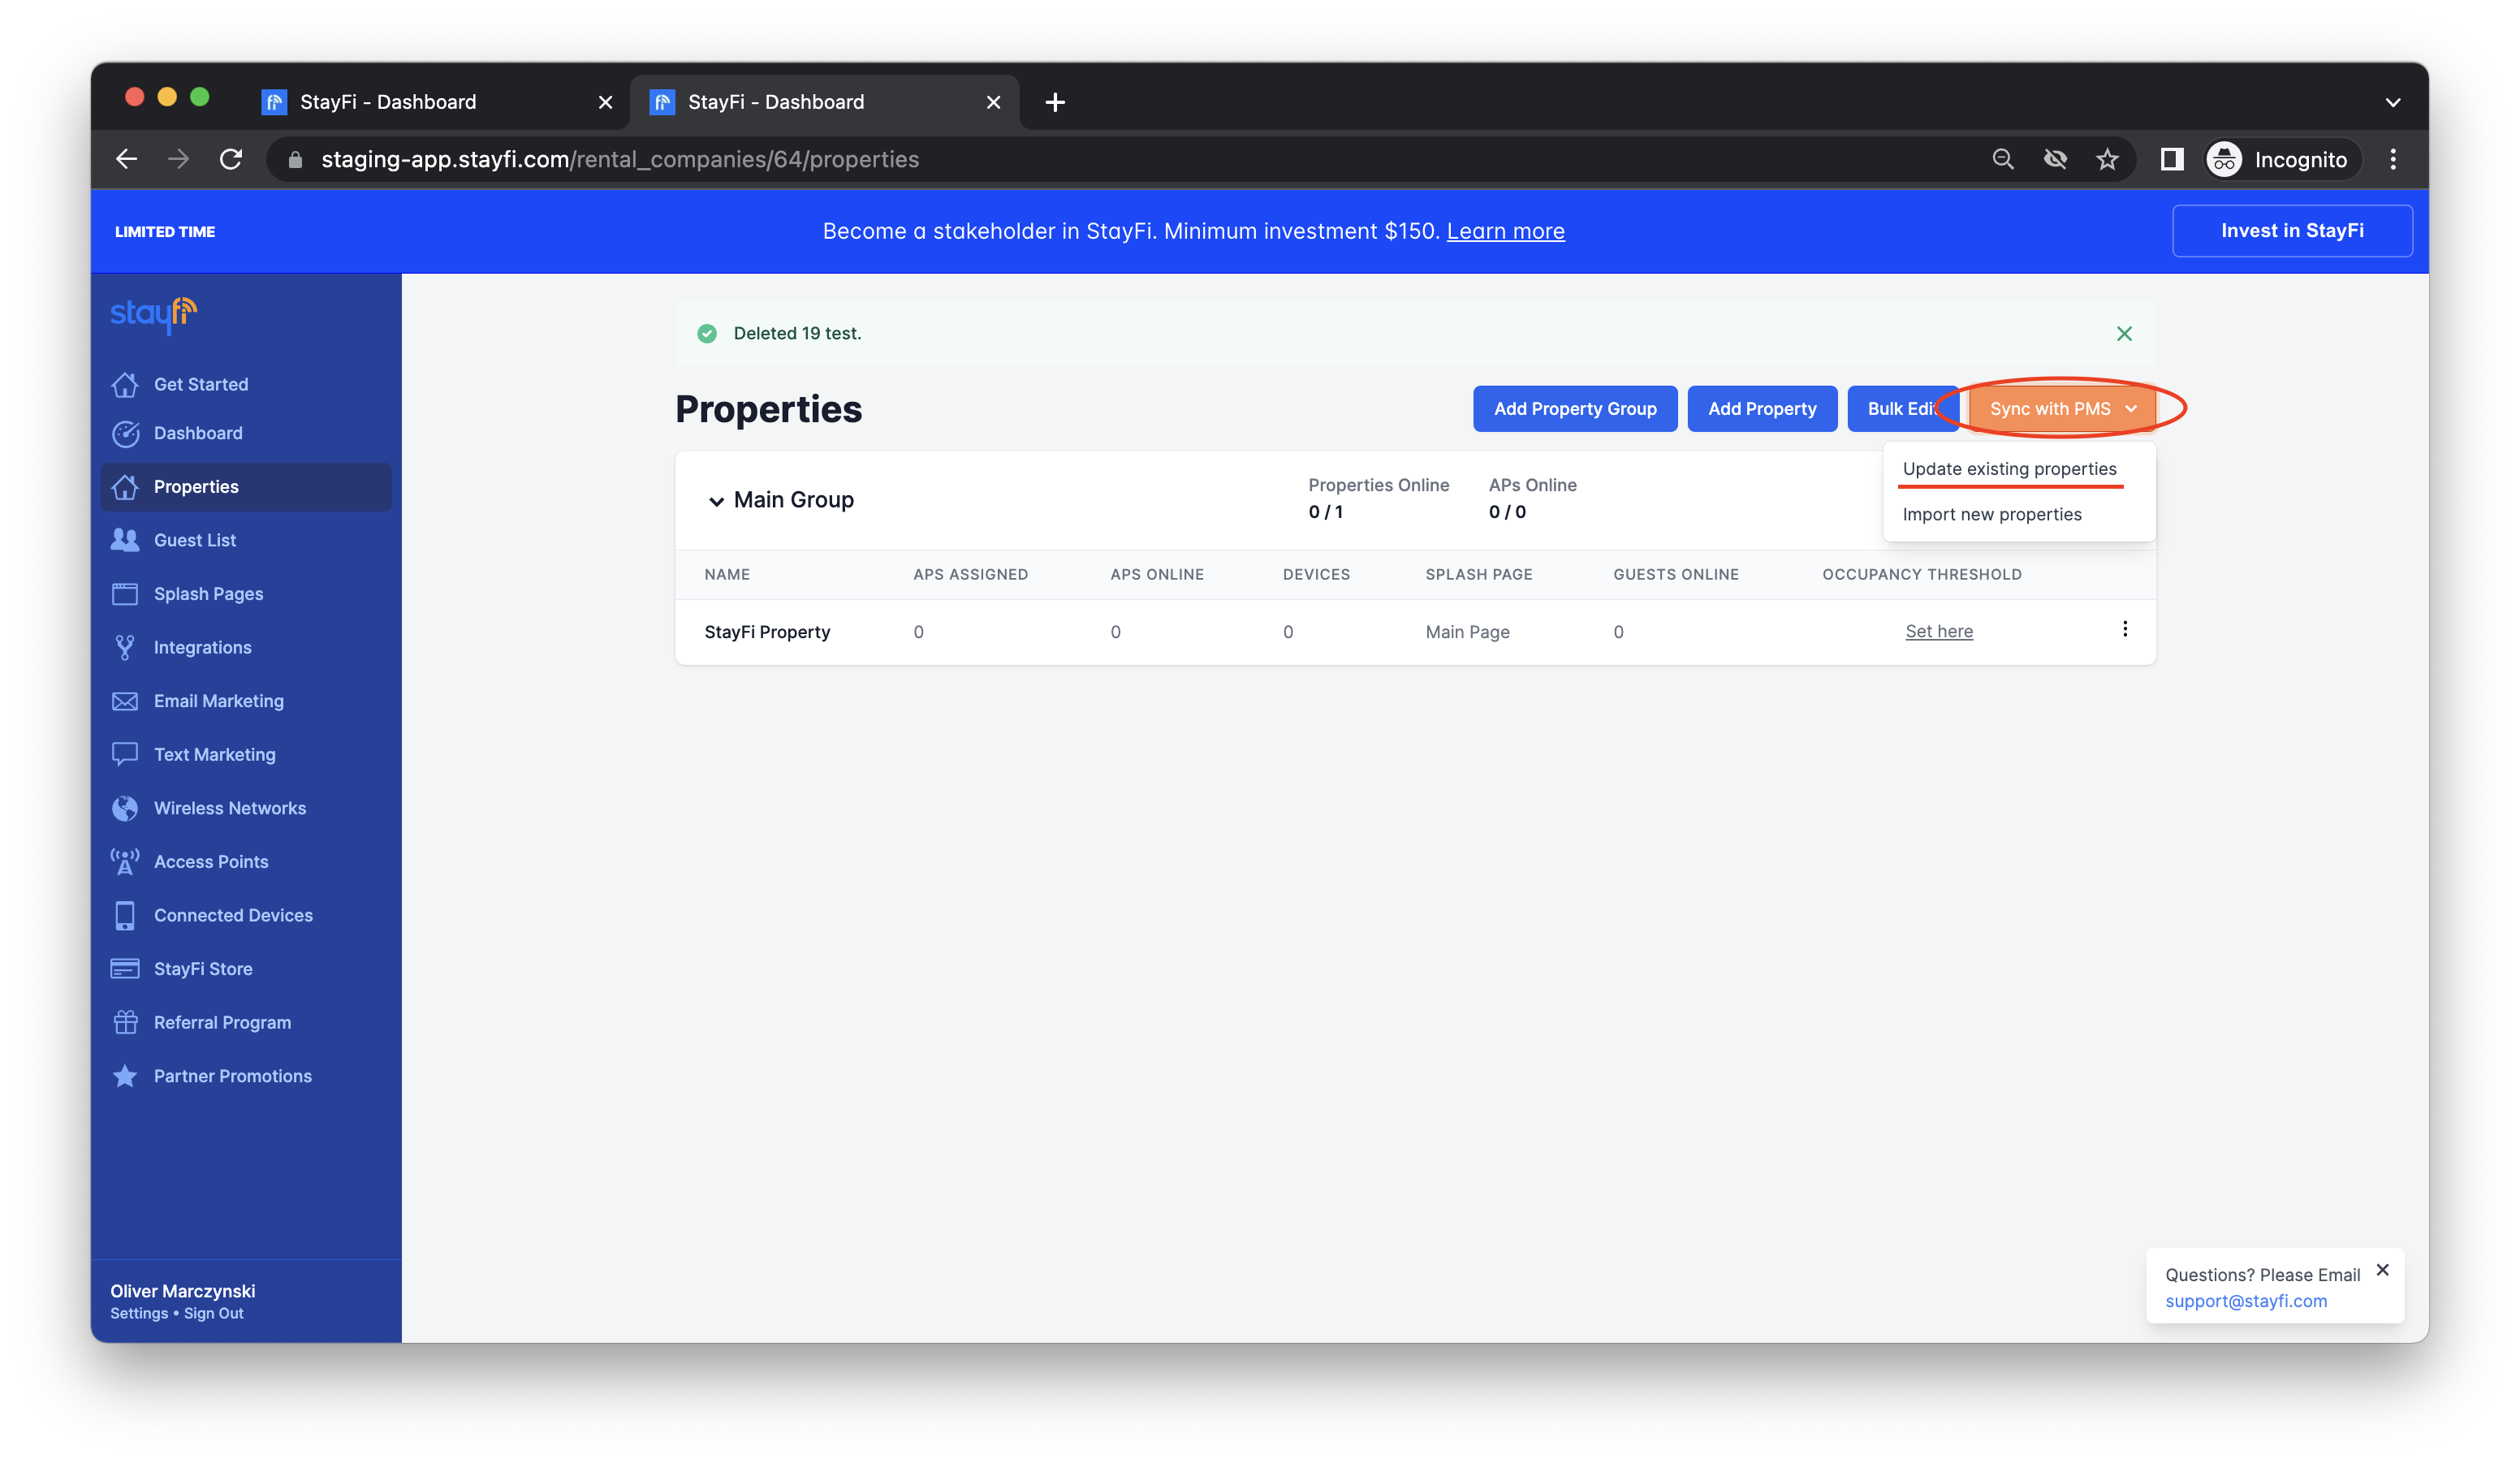
Using the dropdown, select which Guesty property each of your StayFi properties should link with and click Link Properties. Select "Don't link to PMS property" for any StayFi properties you don't want to link. In this example, "StayFi Property" will be linked with the "Cool Place" property in Guesty: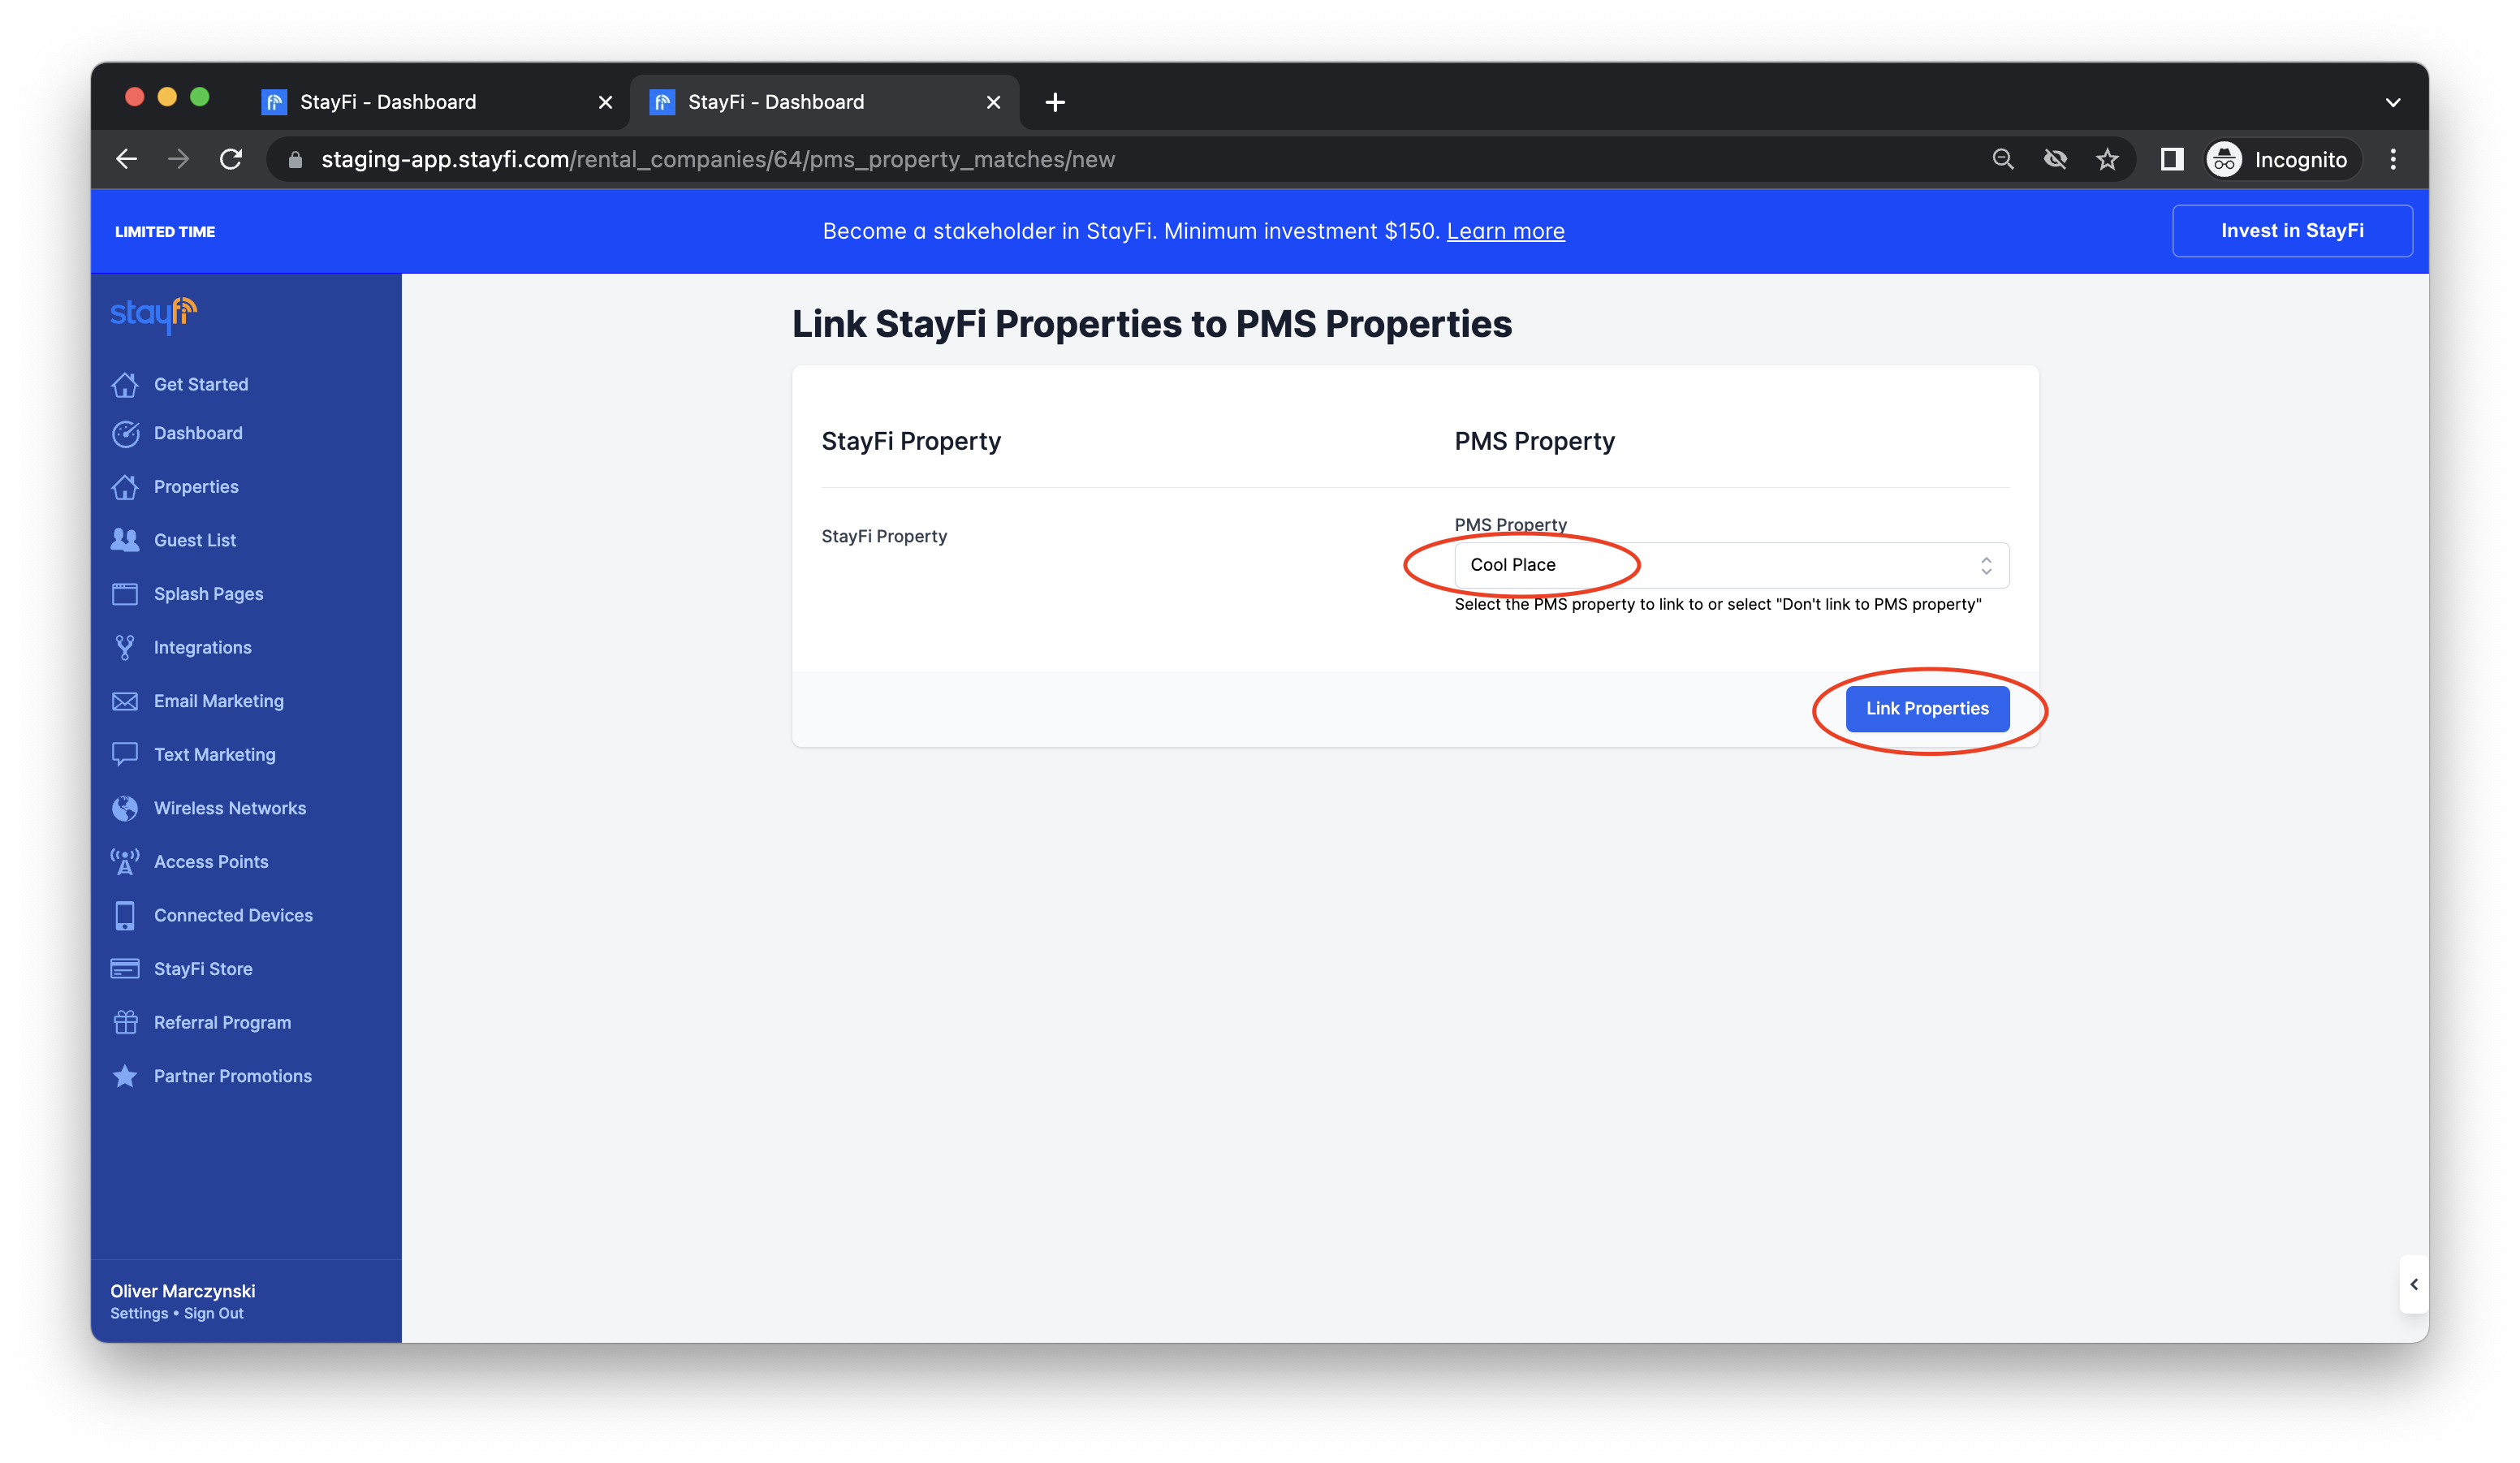
An orange lightning bolt icon will show up next to the name of any properties that have been linked with Guesty. All linked properties will keep their original name in StayFi:
Importing Historic Guesty Contacts to StayFi
Once your Guesty account is connected to StayFi, all new contacts collected in Guesty will automatically be imported into your StayFi guest list going forward. Importing historic contacts lets you track all guest information in one place, and adds contextual booking information to your StayFi guest list. Imported contacts will also be added to your email marketing subscriber list once the email marketing tool is turned on in StayFi, enabling you to send marketing campaigns to all contacts from one place.
If you are setting up your StayFi account for the first time, the onboarding flow will walk you through importing your Guesty contacts into StayFi. If you skipped this step or want to import additional contacts, head to the Guest List page and select Import PMS Guests in the top right corner: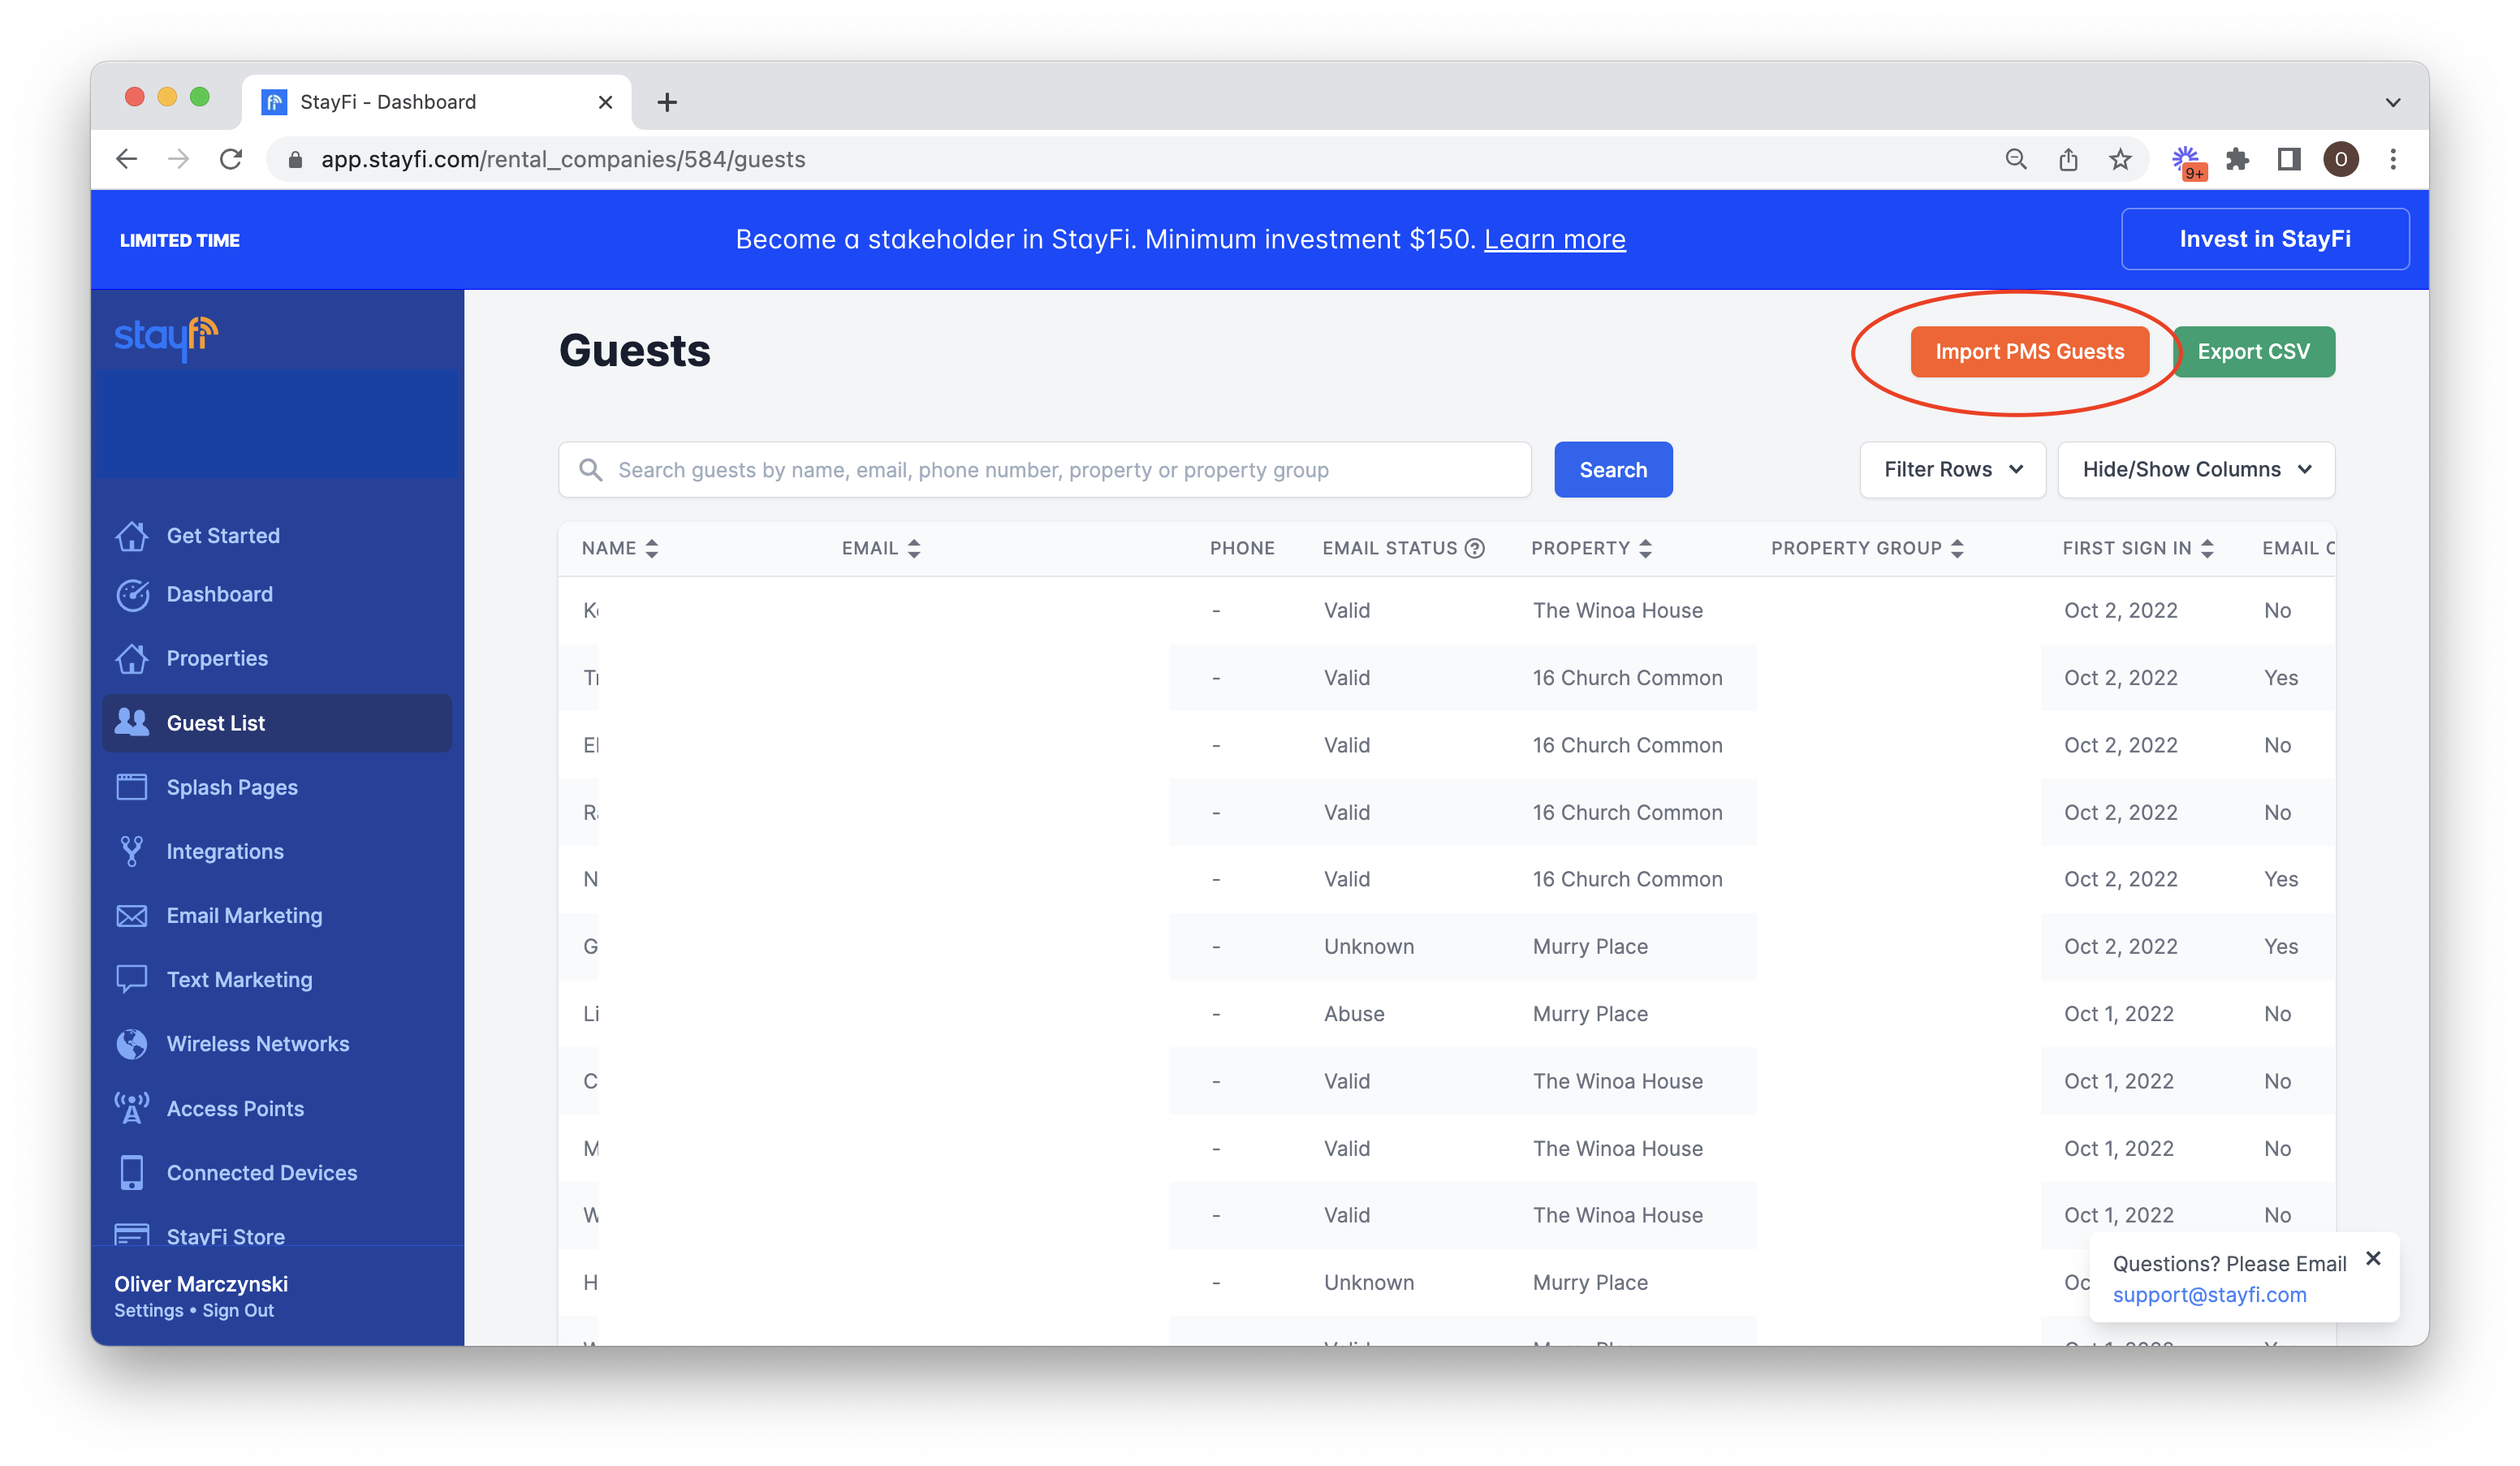
On the following page you'll see a sample of what data will be imported from Guesty. The date range dropdown lets you select which guests you'd like to import from Guesty. "All Time" will import all guests, whereas "Past Year" will only import guests that were added to Guesty in the last year:
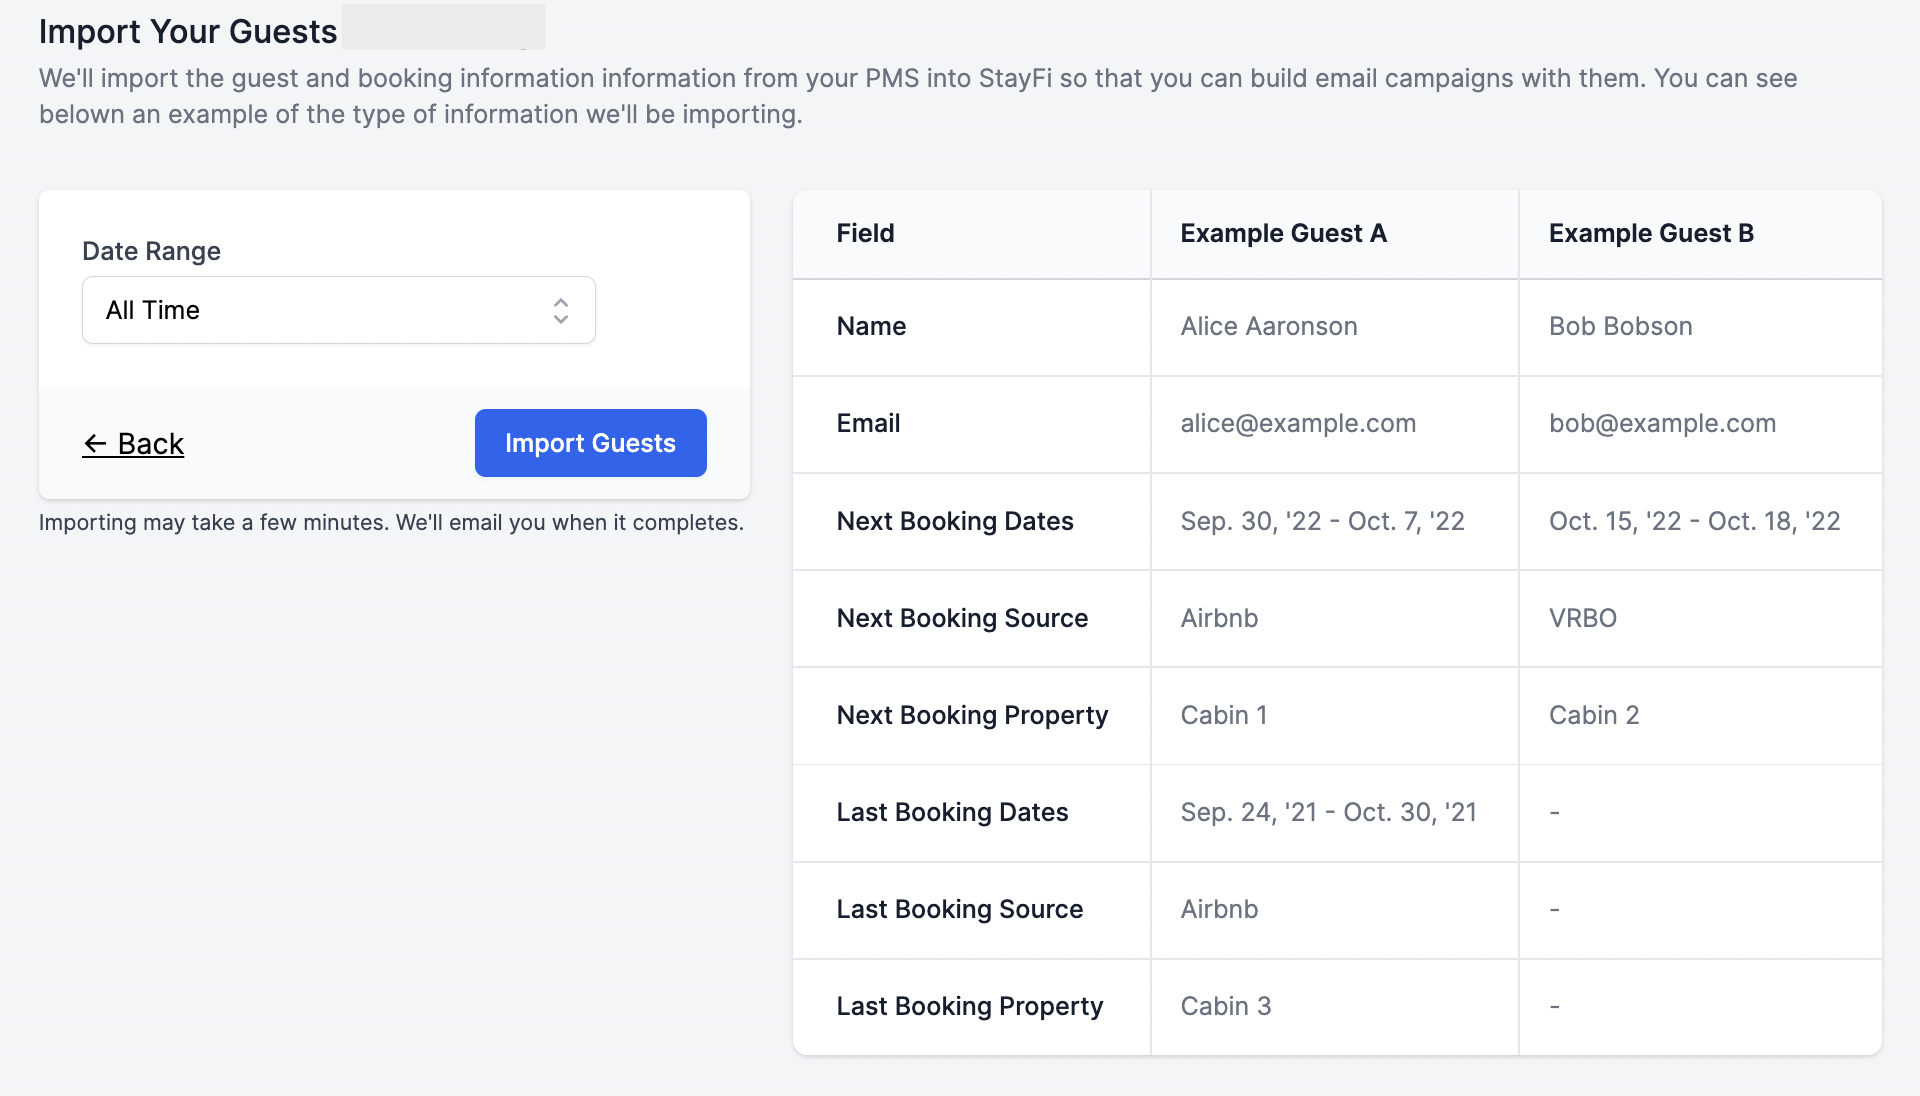
Contacts imported from Guesty will appear in your Guest List with the fields seen above. Use the Filter Rows dropdown to filter contacts based on whether they were imported from your PMS, and use the Hide / Show Columns dropdown to choose what information is displayed in the table. Guests can be searched by name, email, phone number, property, or property group in the search bar at the top: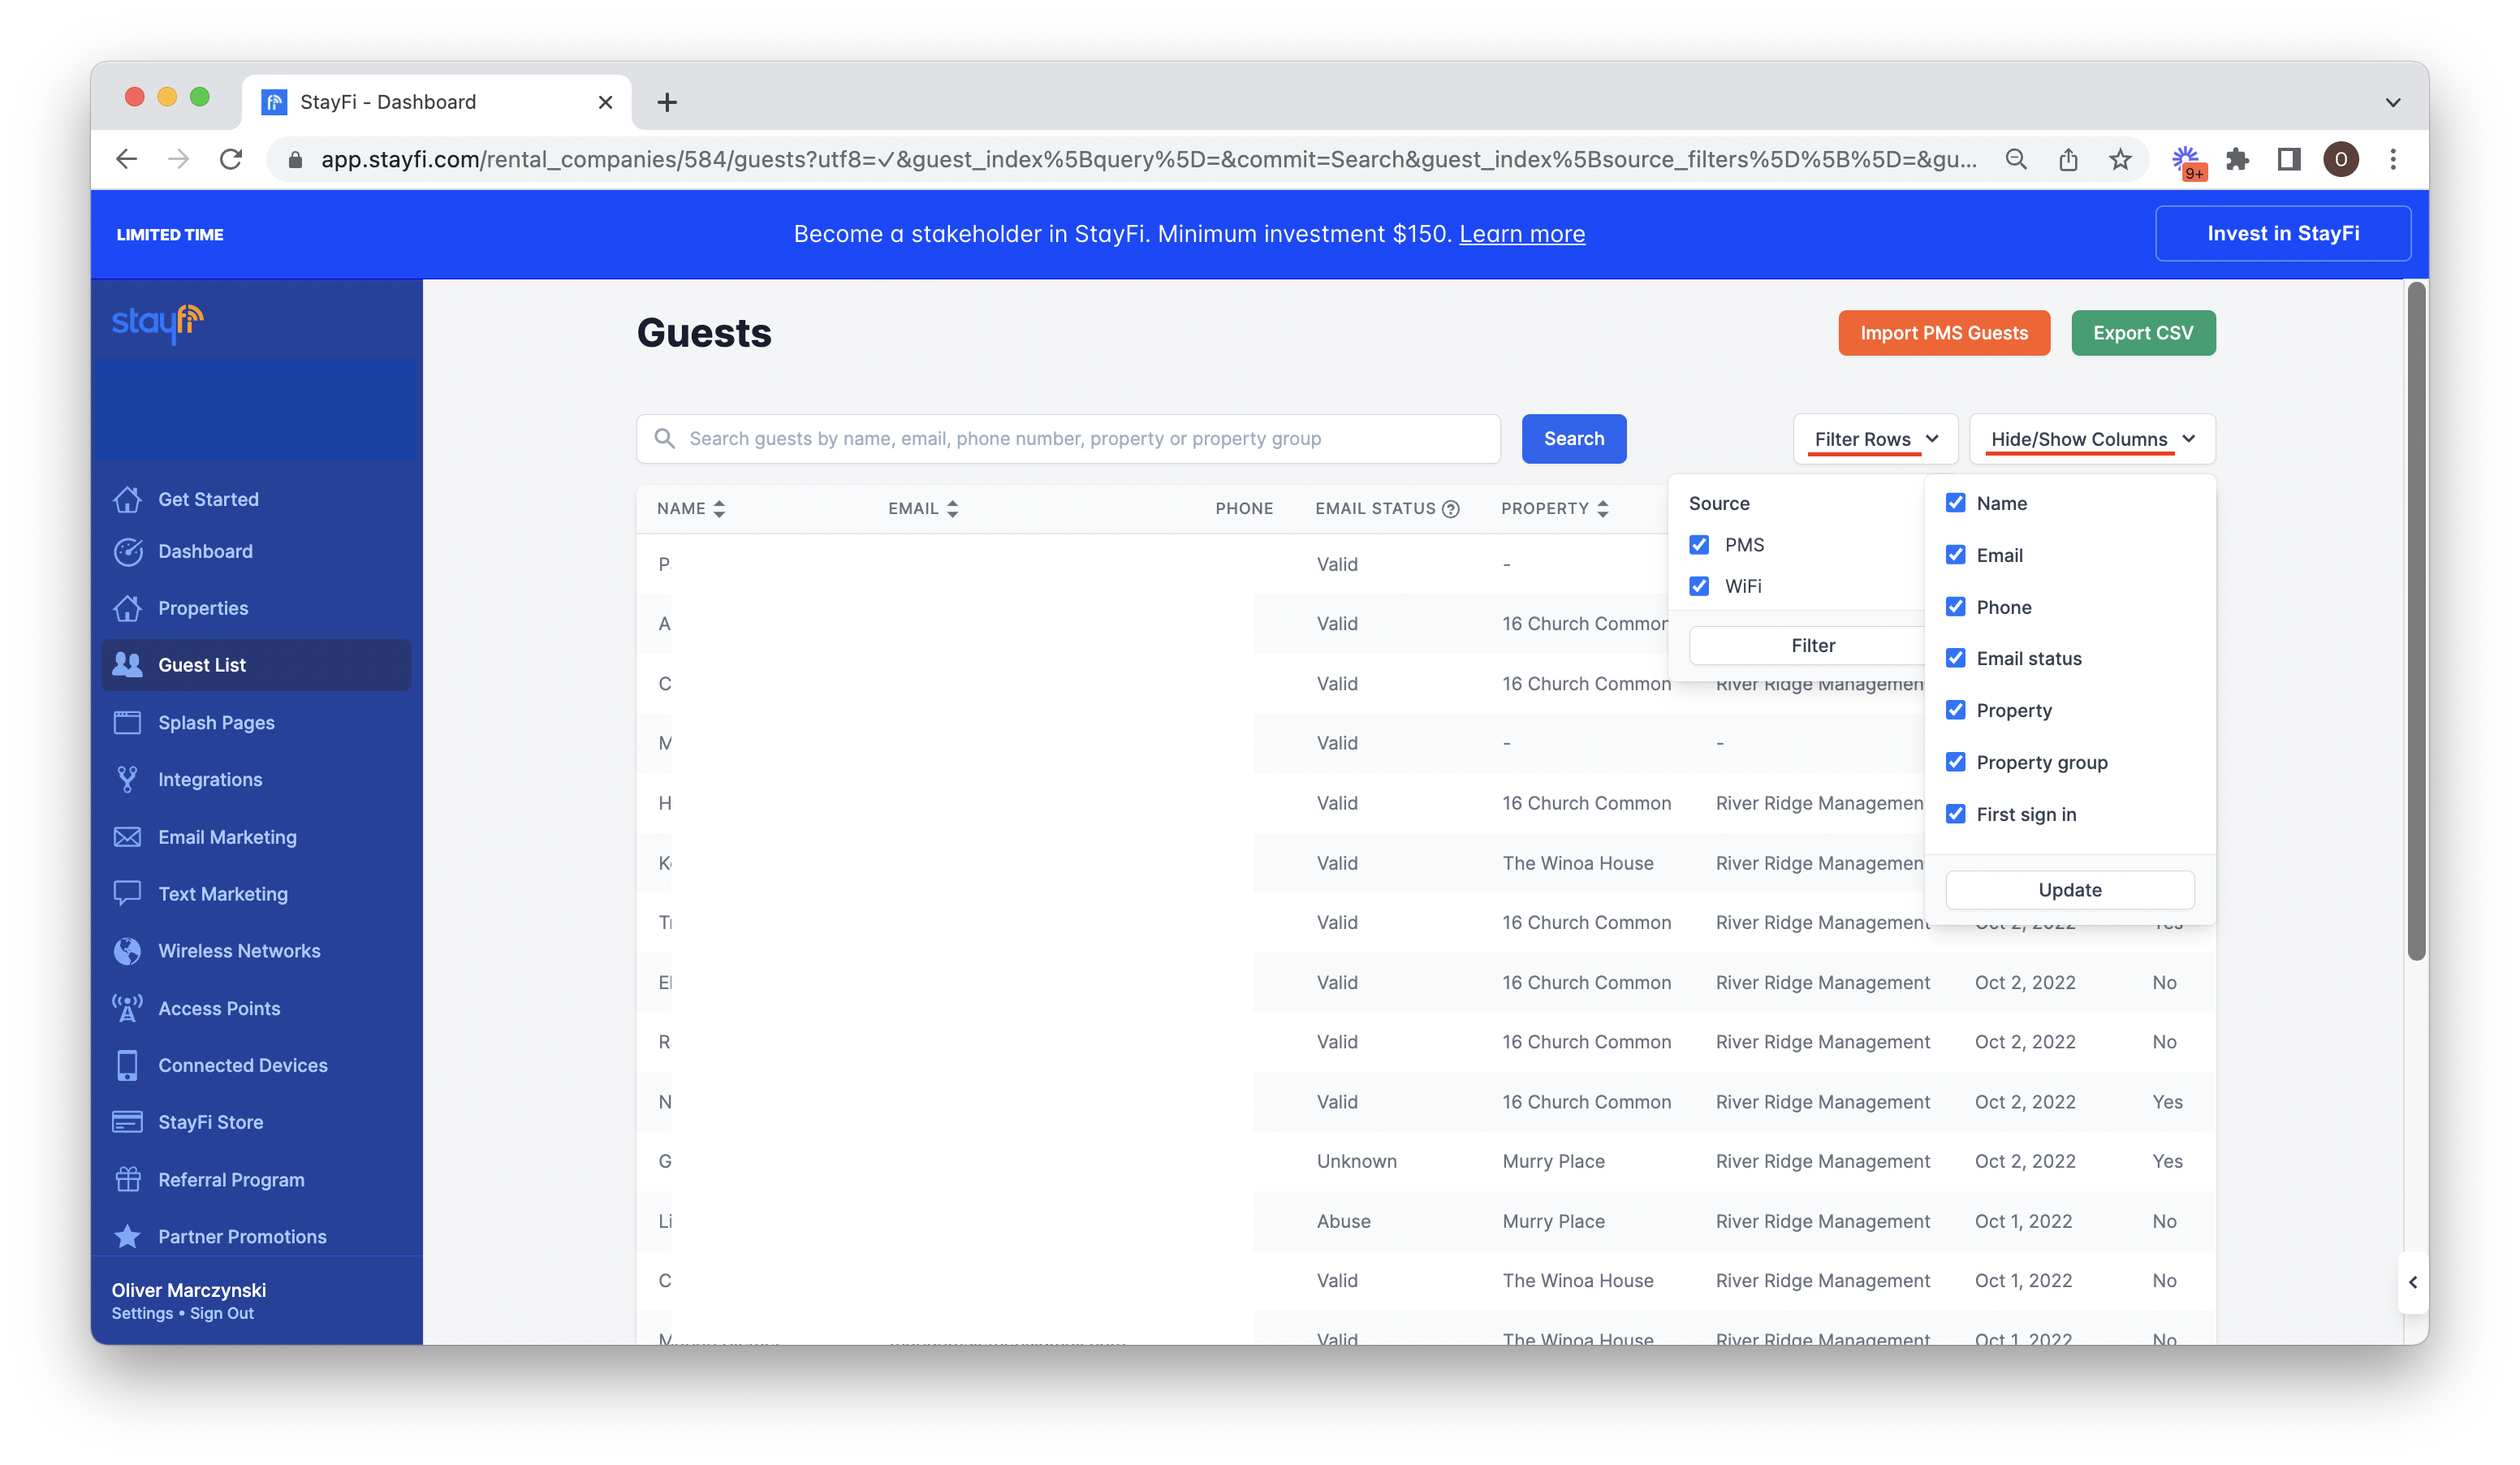
Pushing Guest Data From StayFi to Guesty
If you are using StayFi's wifi splash pages, all guest information collected through the splash pages will be pushed back into the Guesty Guestbook. This is a great way to keep track of every guest who stayed at your property during each reservation, not just the booker. Use this to see which guests have stayed at your property in the past and have additional points of contact for each stay if you can't get in touch with the booker.
StayFi contacts will automatically push to Guesty as they are collected. Each contact pushed to Guesty will include the guest's name, email address, phone number, and date added.

Using Guesty Contacts in StayFi's Email Marketing
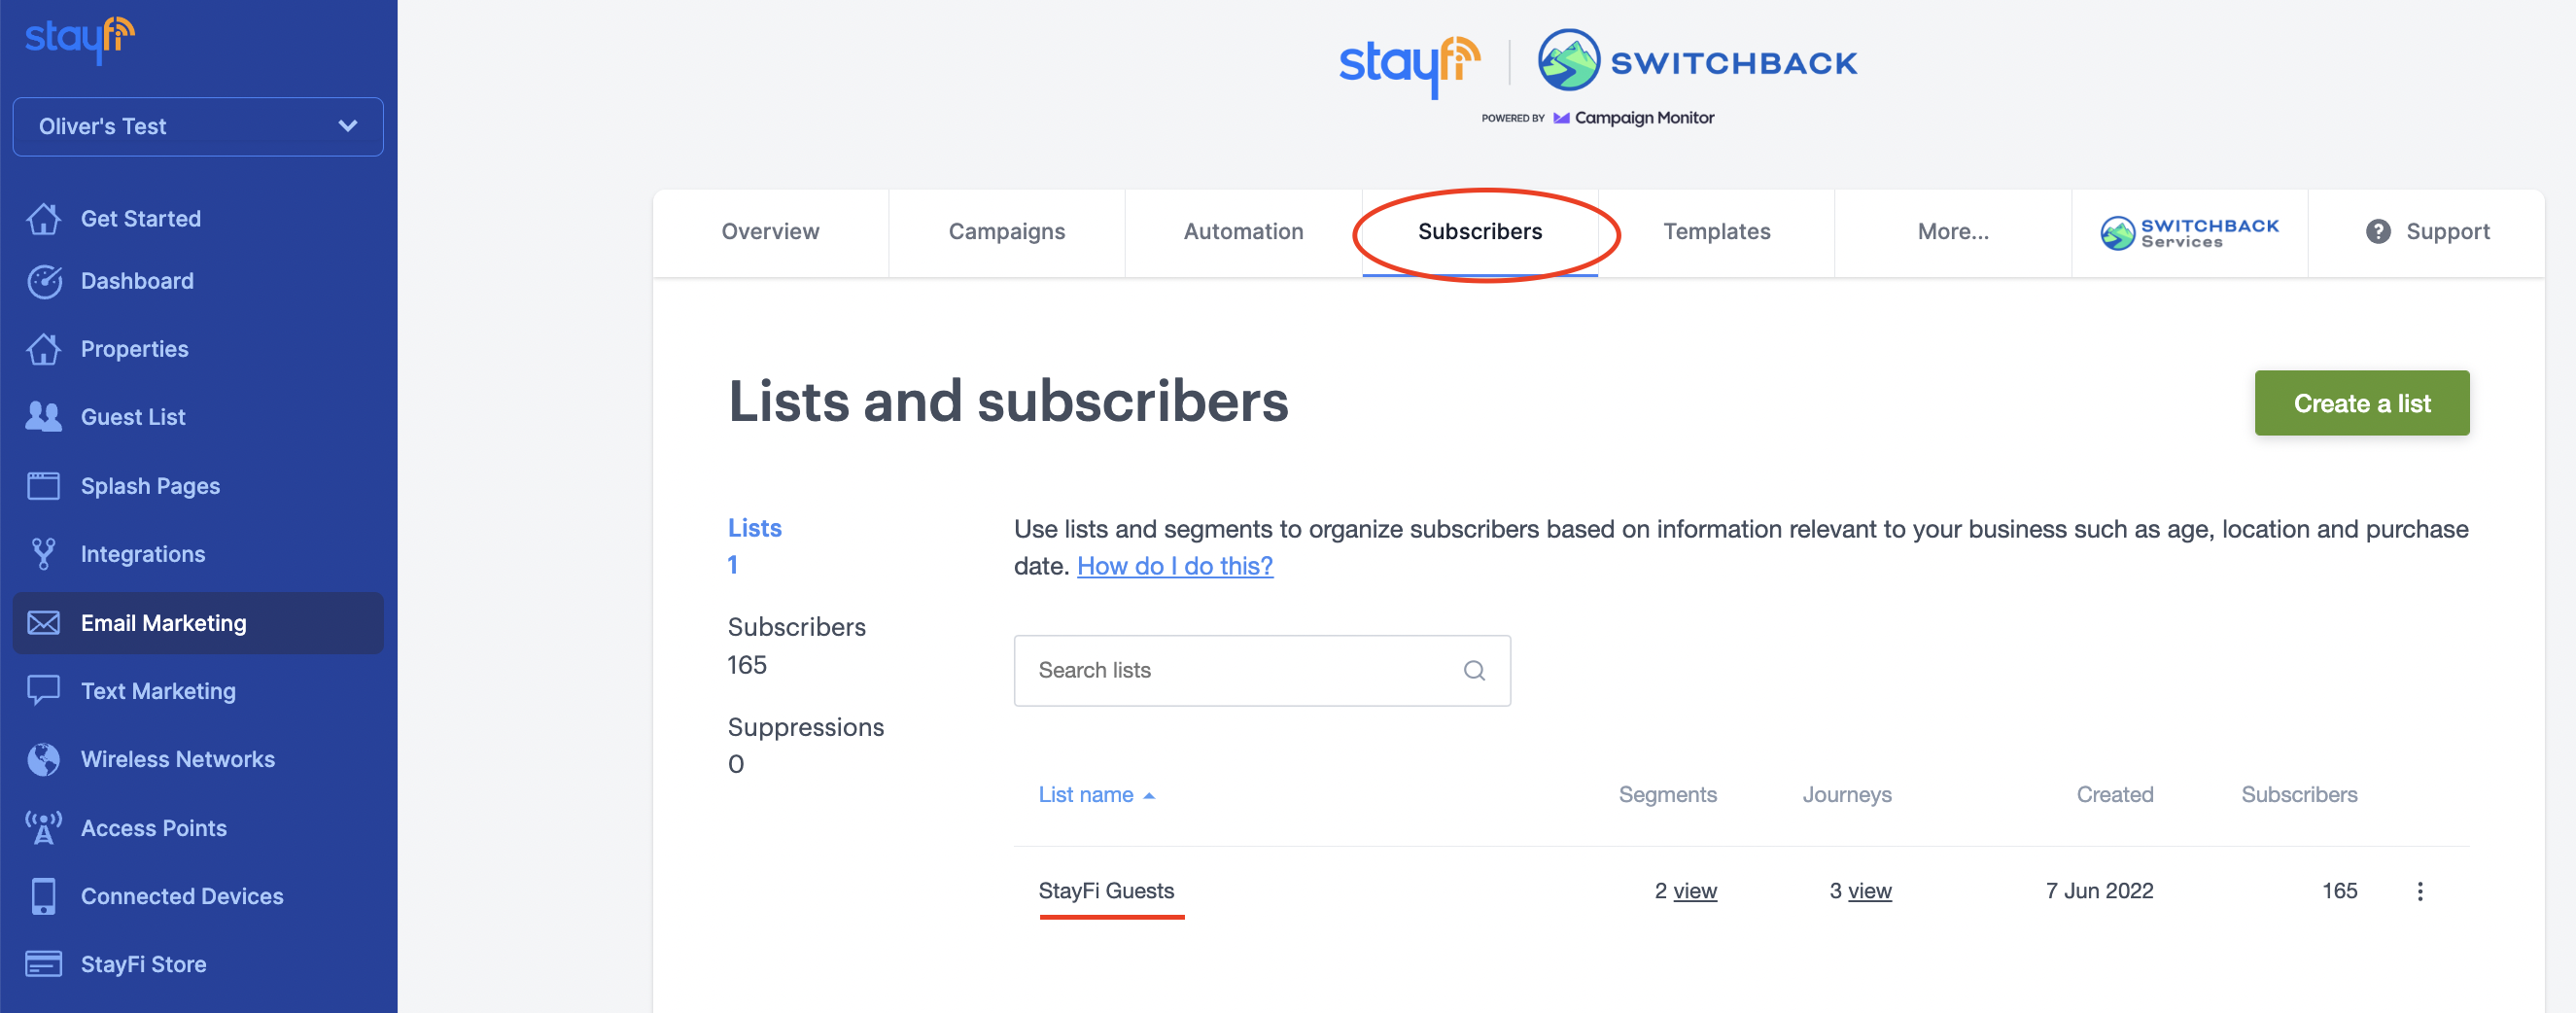
StayFi's email marketing tool makes it easy to send subscribers one-time email campaigns, or enroll them in automated emails journeys. This is a great way to build brand awareness and stay in touch with past guests who might rebook your property in the future. Once you turn on email marketing, all contacts from your StayFi Guest List who opted into email marketing will be added to your Email Marketing Subscribers list. Make sure to import your historic Guesty contacts into StayFi to be able to market to them through the Email Marketing tool.
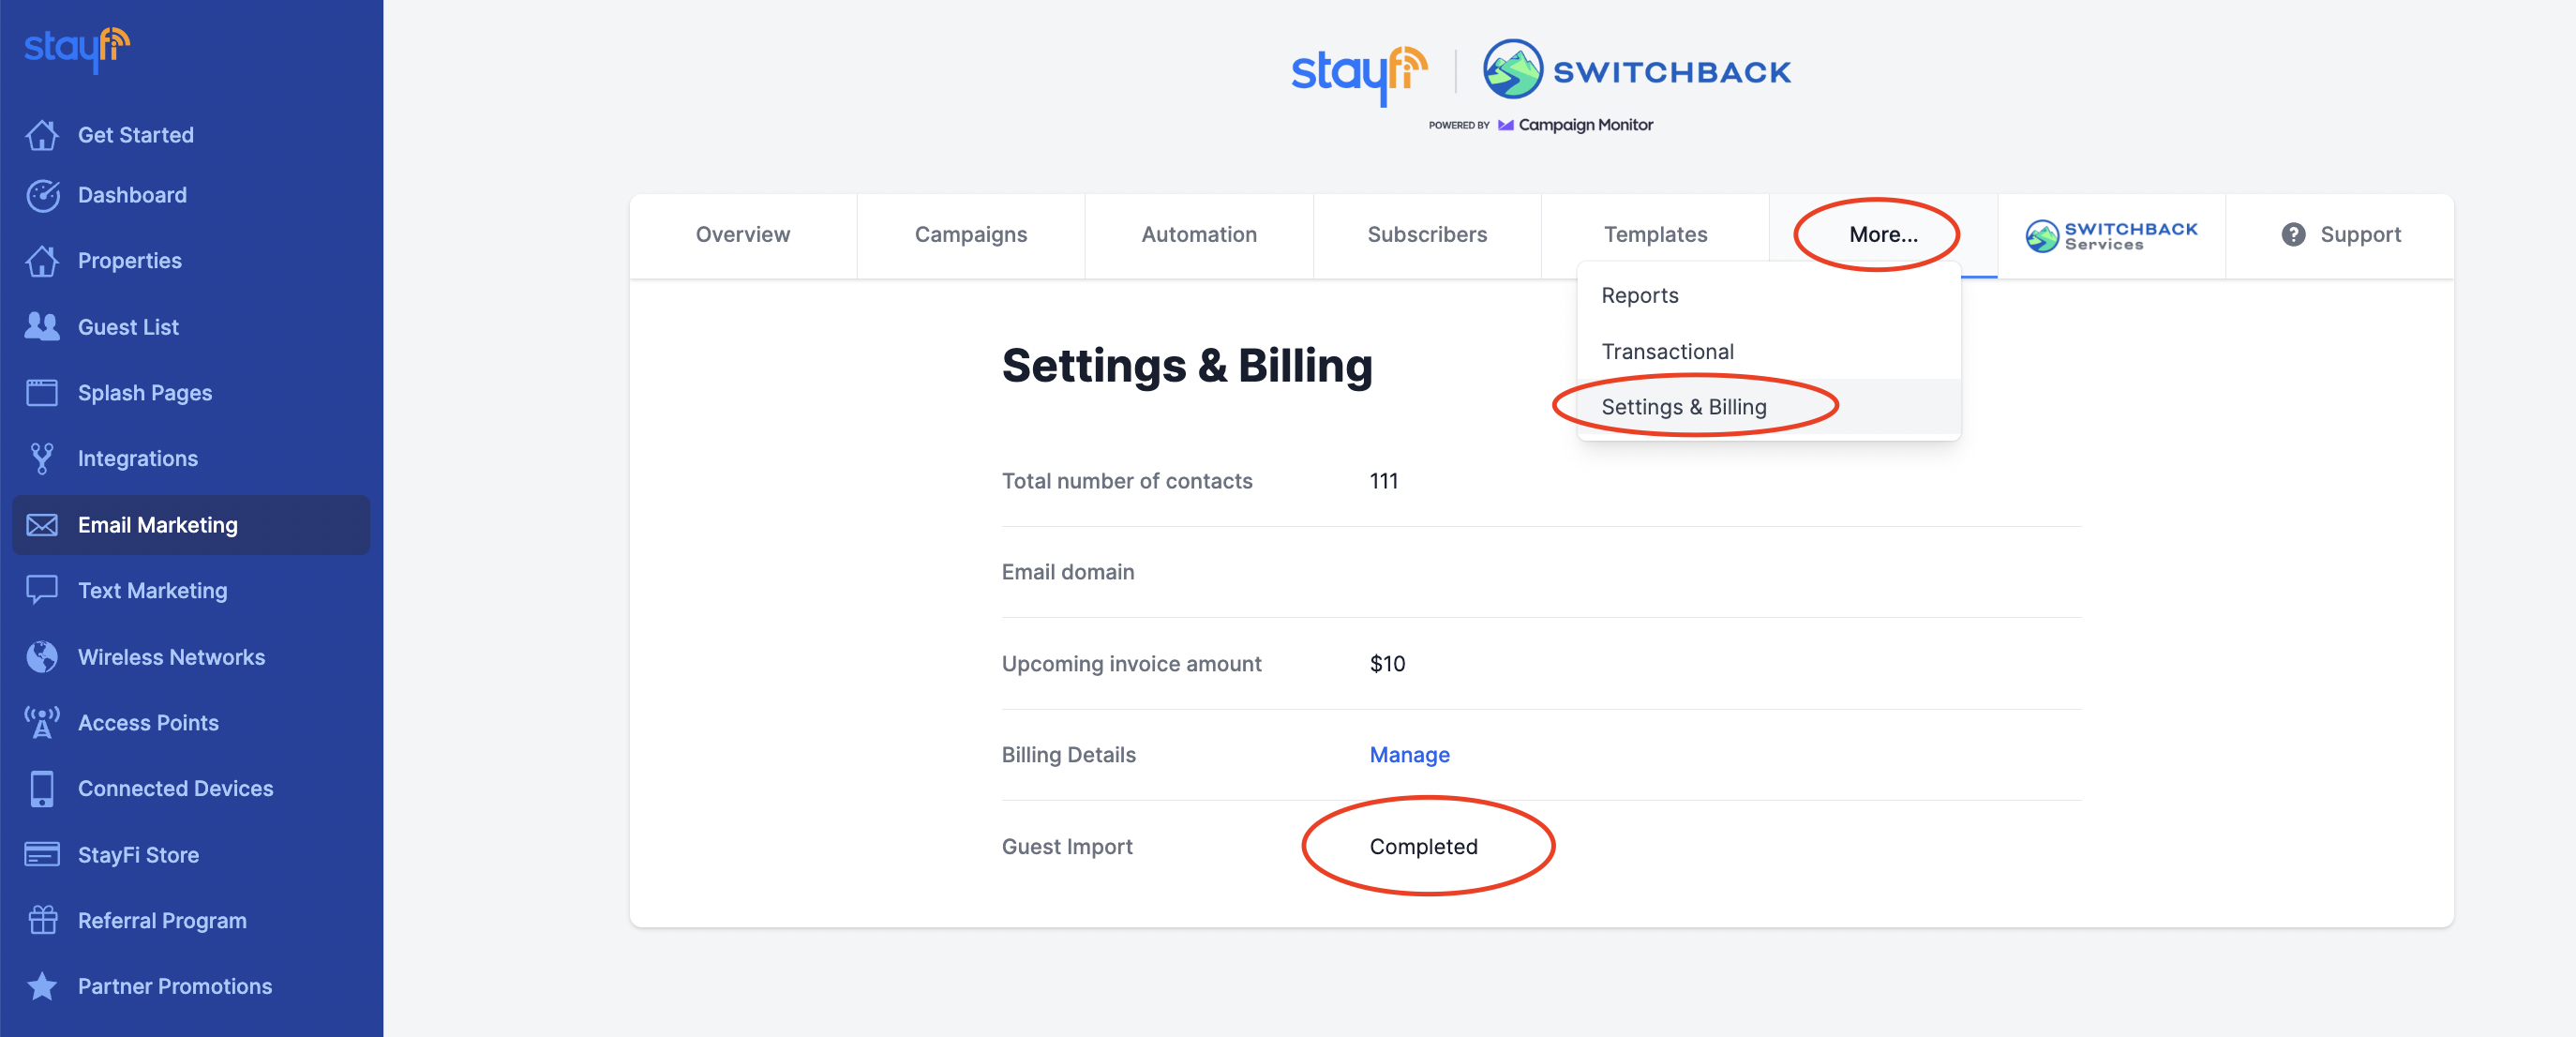
After activating email marketing from the Email Marketing page in StayFi, make sure to select Import Existing Contacts during the onboarding process. If you don't do this during onboarding, you can import contacts at any point by selecting More > Settings and Billing > Import Contacts.
After you've imported contacts once, all future guests will automatically be added to your Email Marketing Subscribers under the "StayFi Guests" list. The following fields will automatically be filled out for all Guesty contacts imported into StayFi:
- Source
- Arrival Date
- Departure Date
- Book Date
- Property
- Property Group
These fields, along with their corresponding "last" / "next" fields which show the same information for previous and future bookings can be used to segment contacts, trigger automations, and dynamically insert content into your email marketing campaigns.
Refer to our Email Marketing setup document for more information on setting up email marketing in StayFi.
Dynamic Occupancy Alerts
Occupancy alerts have traditionally been used to send email notifications if more unique guests than a certain threshold connect to the wifi at the same time. While this is invaluable for identifying when guests exceed the maximum occupancy of the property, it doesn't identify when guests exceed the occupancy reported on their reservation.
With Guesty connected, you can set dynamic occupancy alerts for your properties, where the occupancy threshold for the alert becomes the number of guests listed on the reservation. This way if the maximum occupancy for the property is 8, but the reservation was made for 4 people, you will still receive an occupancy alert if 5 unique guests connect to the wifi at the same time. Dynamic occupancy alerts can be particularly helpful for seeing which guests misreport occupancy if you charge extra person fees for your property.
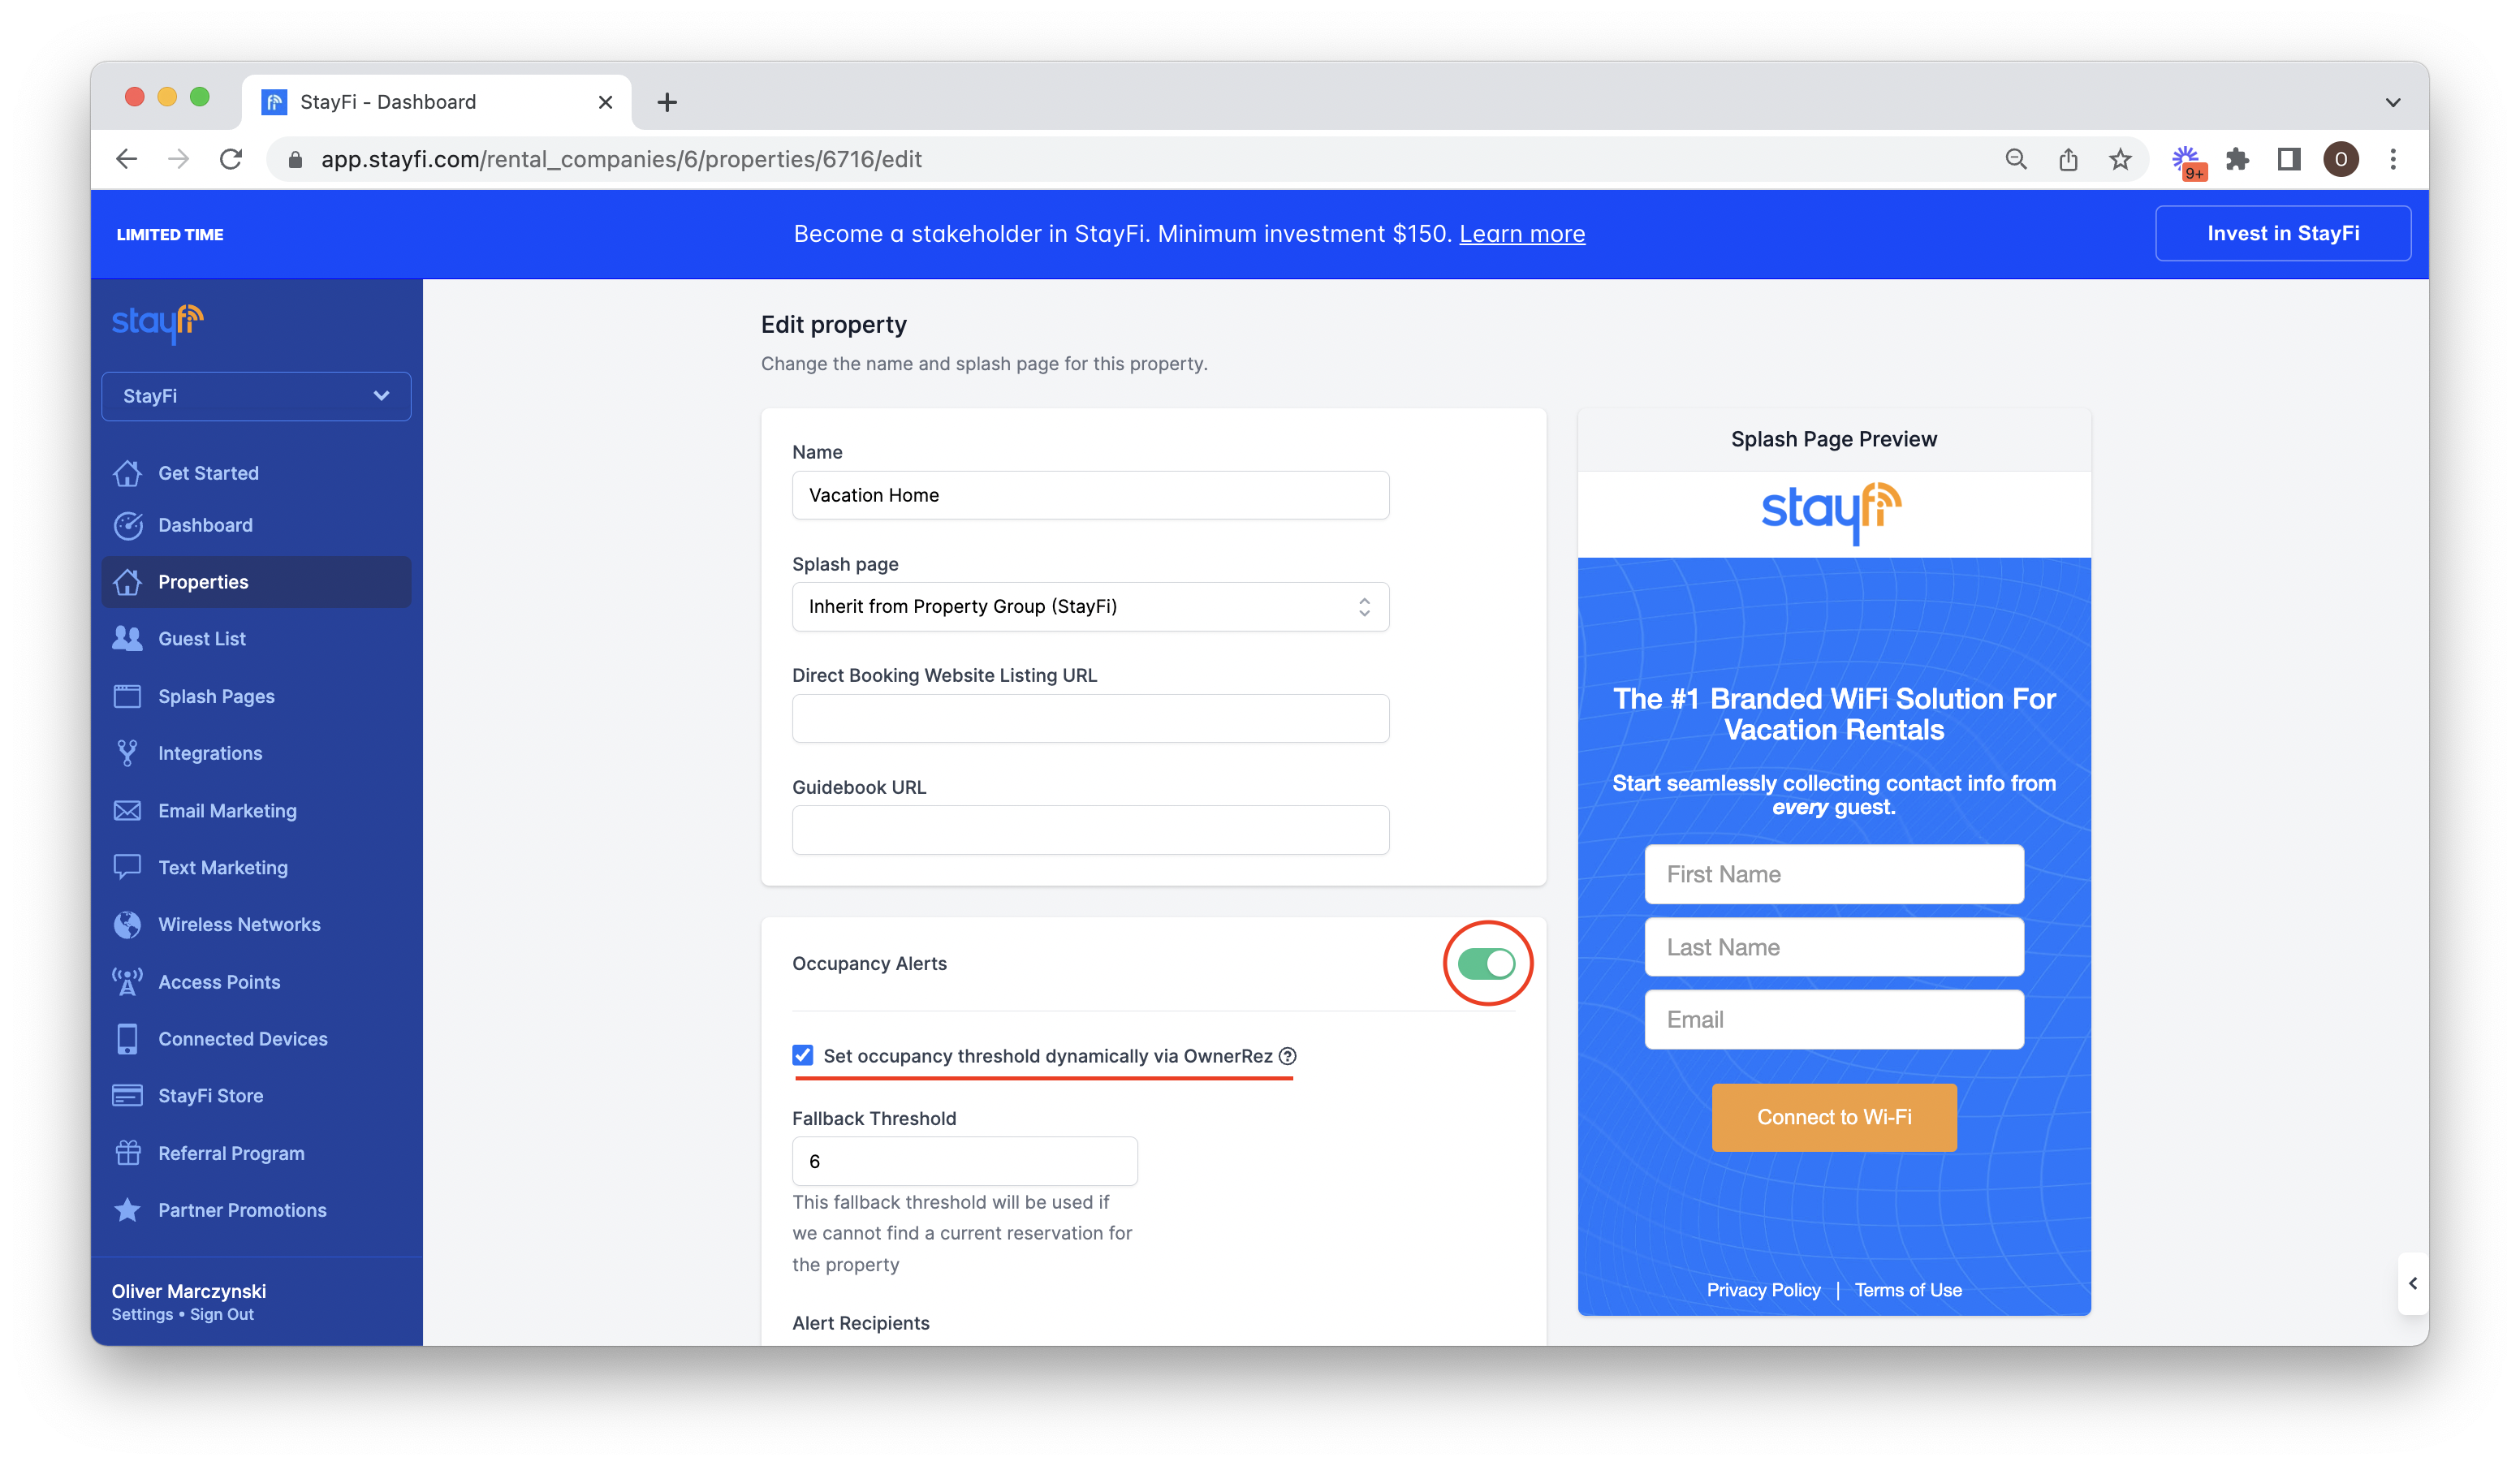
To set dynamic occupancy alerts, head to the Properties page in StayFi and select Set Here under the Occupancy Threshold column, or select the three dots on the right and click Edit:
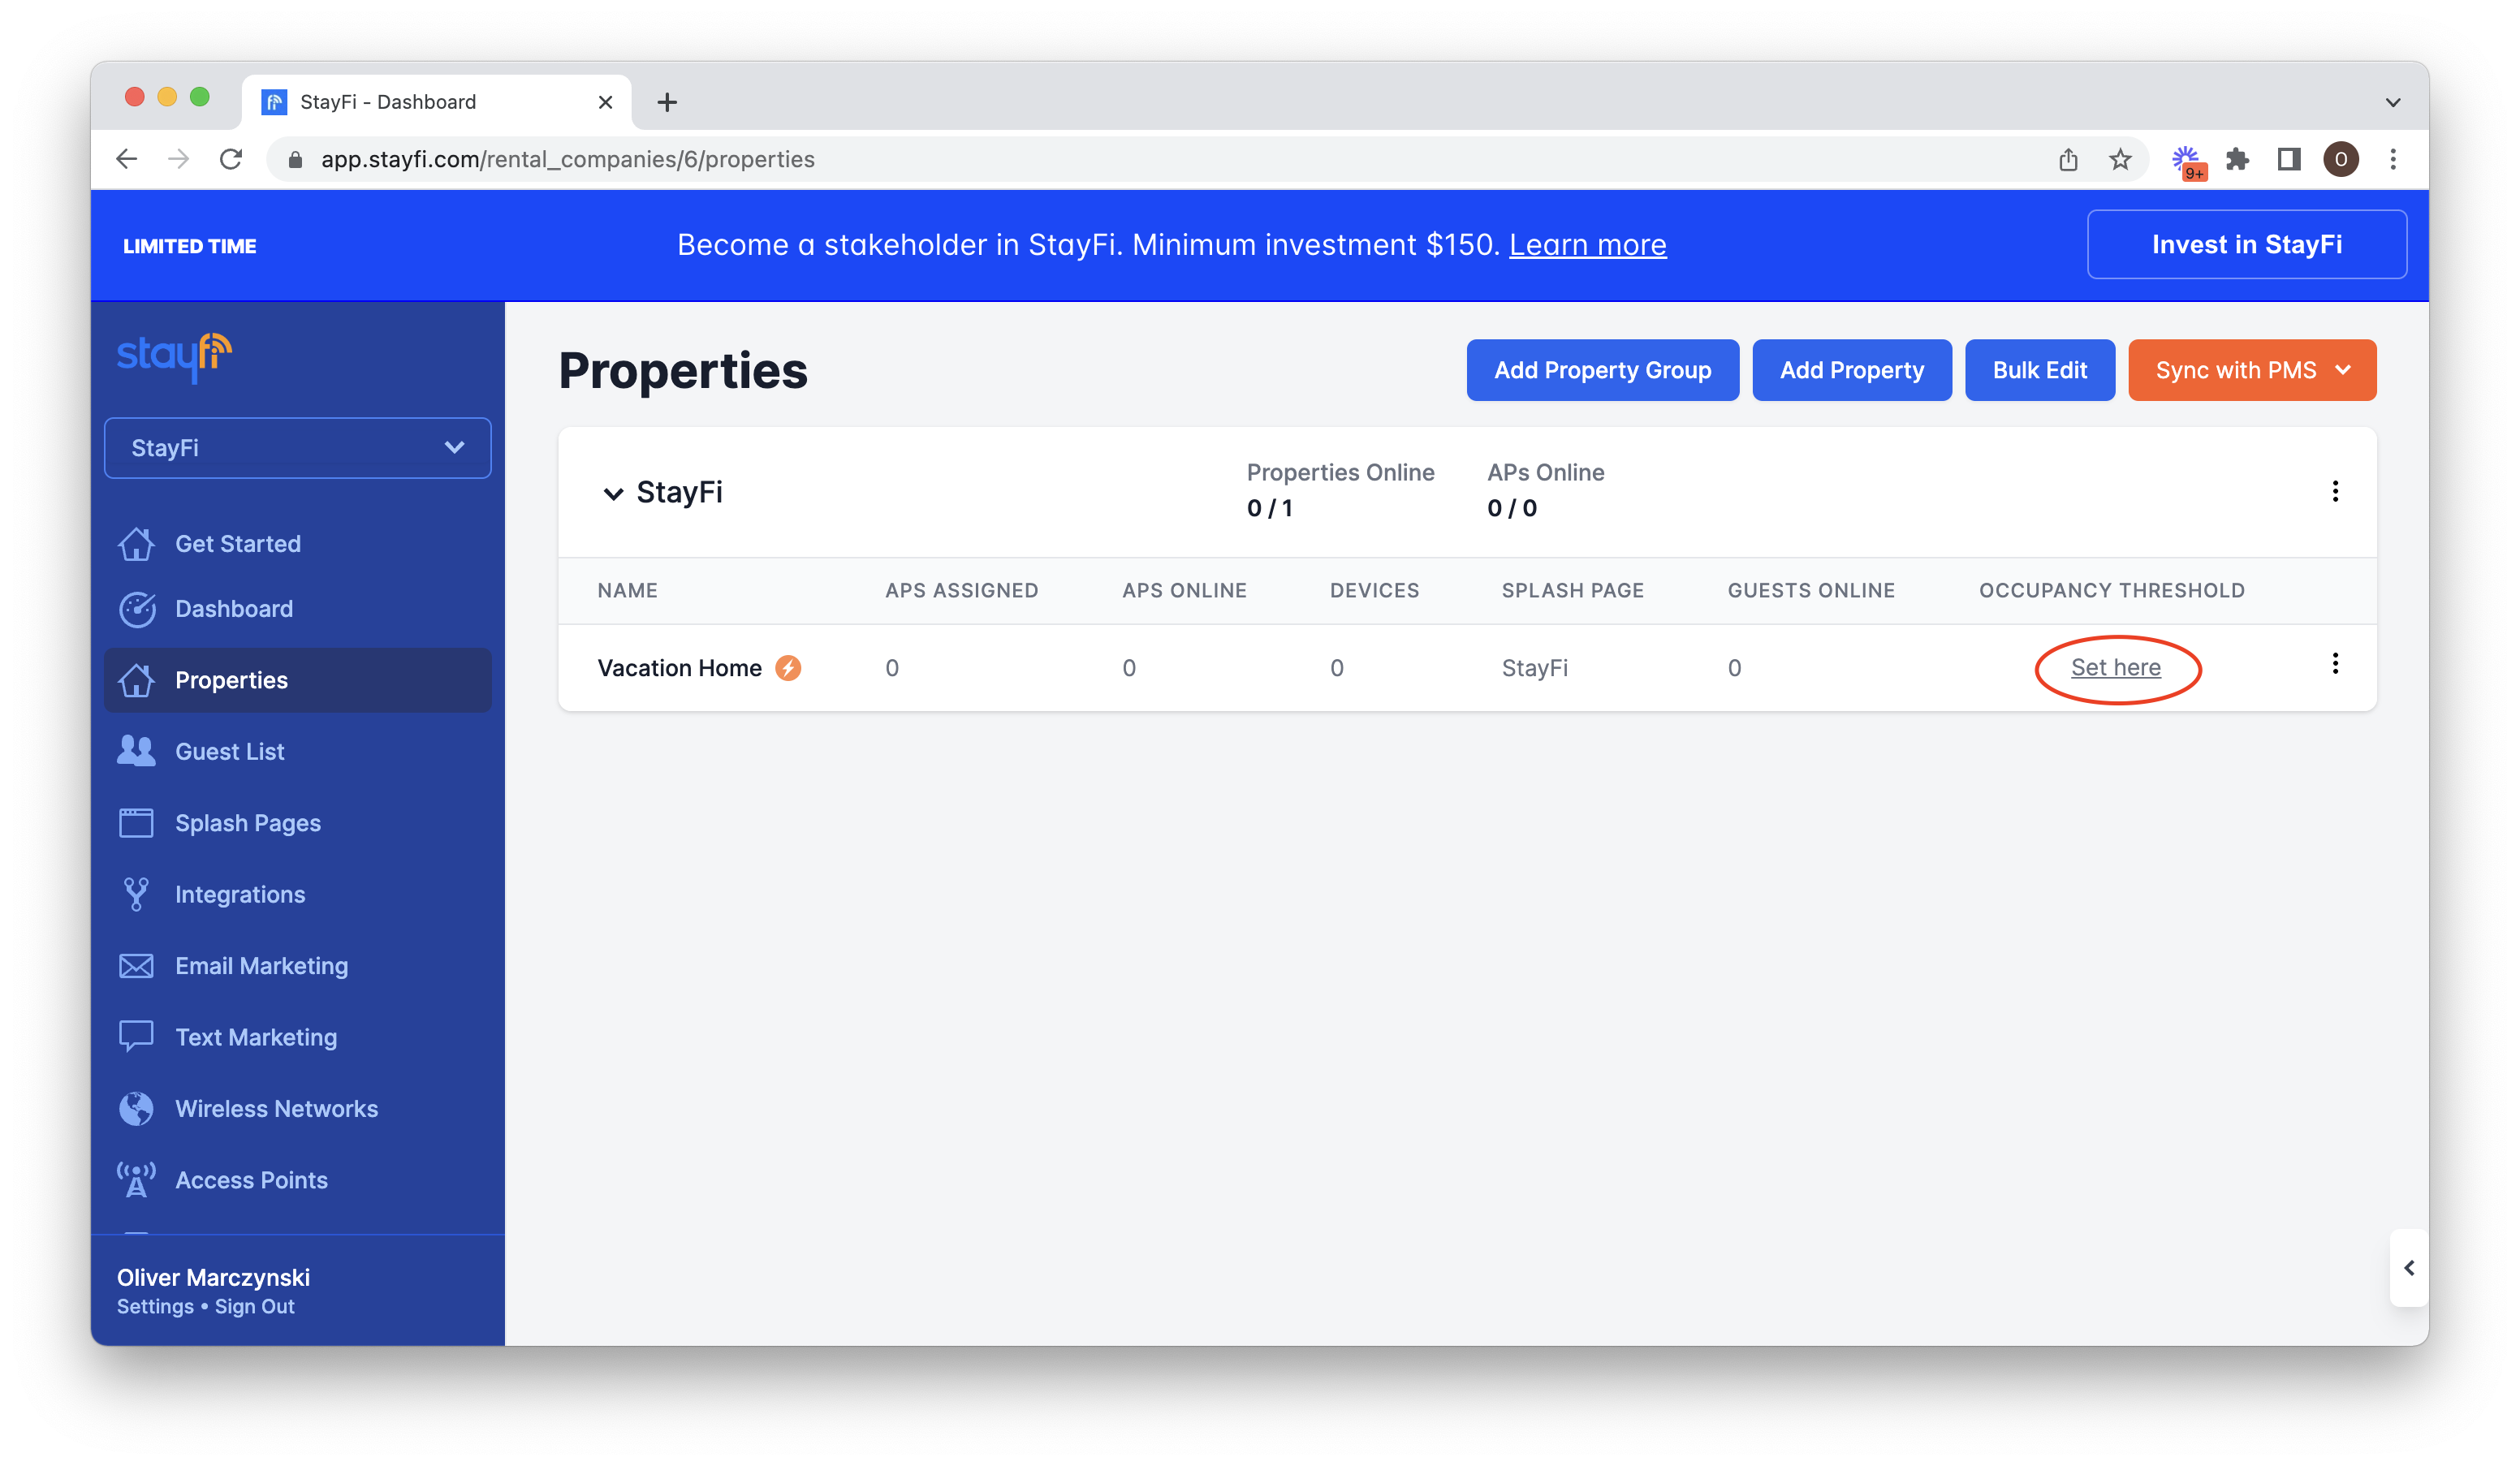
Turn on the Occupancy Alerts toggle and check the box next to "Set occupancy threshold dynamically via Guesty". Set a fallback threshold which will be used as the default threshold if StayFi cannot find a current reservation for the property. Select an alert recipient and click update:
Occupancy alerts will now be emailed to the alert recipient whenever guests exceed the occupancy of their reservation.
Please send any questions about the Guesty integration or Email Marketing in StayFi to support@stayfi.com